
Updated January 31, 2026
Ready to take your smart home to the next level? Imagine gaining native Home Assistant PC control. We’re not just talking about turning it on and off. We’re talking about monitoring performance, launching apps, sending notifications, and creating powerful automations that make your computer a first-class citizen in your smart home ecosystem. In this definitive 2026 guide, we’ll walk you through the most modern and robust method to achieve this, turning your PC into just another entity on your dashboard.
And the best part? Once you can control your PC from Home Assistant, you can also use your voice with Alexa or Google Assistant.
Prepping Your PC: The Non-Negotiable First Steps
Before we install any software, we need to configure your computer at a low level to allow it to be woken up remotely. These steps are crucial and cannot be skipped.
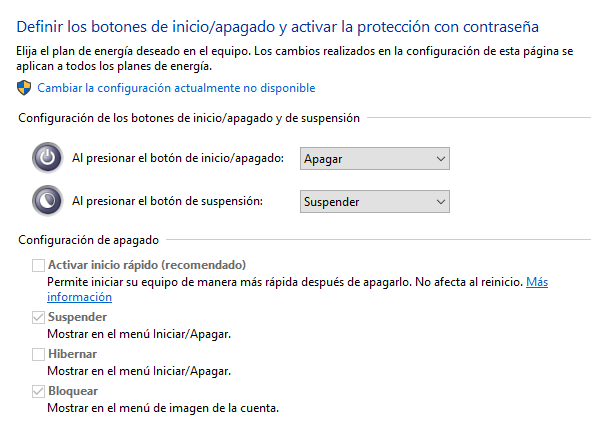
1. Disable Windows Fast Startup
Windows “Fast Startup” is a feature that doesn’t fully shut down your PC. Instead, it places it into a deep hibernation state. This prevents Wake on LAN technology from working correctly. Here’s how to disable it:
- Open the Control Panel (you can search for it in the Start Menu).
- If the view is set to “Category,” change it to Small icons.
- Click on Power Options.
- In the left-hand menu, select Choose what the power buttons do.
- Click the blue text that says Change settings that are currently unavailable. You’ll need administrator permissions.
- Uncheck the box for Turn on fast startup (recommended).
- Click Save changes.
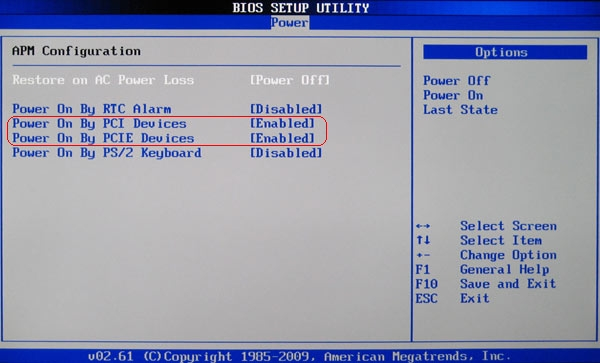
2. Enable Wake on LAN (WoL) in Your BIOS/UEFI
Wake on LAN (WoL) is the core technology that allows a computer to be turned on by sending it a special data packet over the network. It must be enabled in your motherboard’s settings (BIOS or UEFI).
To enter the BIOS/UEFI, restart your PC and repeatedly press the key indicated on the boot screen (usually Del, F2, F10, or Esc).
The exact location of this setting varies wildly between manufacturers (ASUS, Gigabyte, MSI, etc.), but you’ll generally find it under sections like:
- Power Management (APM)
- Advanced Settings
- Onboard Devices Configuration
Look for an option called Power on by PCI-E/PCI, Wake on LAN, or Remote Wake Up and make sure it is set to Enabled. Save your changes and exit the BIOS/UEFI. Your PC will then restart.
3. Get Your PC’s MAC Address
The MAC address is the unique identifier for your network card. Home Assistant needs it to know which device to send the power-on command to. Here’s how to find it:
- Press the
Win + Rkeys to open the “Run” dialog box. - Type
cmdand press Enter to open the Command Prompt. - Type the command
ipconfig /alland press Enter. - Look for your primary network adapter (usually named “Ethernet” or “Wi-Fi”). The Physical Address is your MAC address. Copy it down; you’ll need it later.
The 2026 Gold Standard: Full Integration with HASS.Agent
While older tools like IOT Link were used in the past, the undisputed solution in 2026 is HASS.Agent. It’s an open-source, actively maintained piece of software designed specifically for a deep and seamless Home Assistant PC integration. It leverages MQTT auto-discovery, which completely eliminates the need to manually configure dozens of entities in YAML.
Installing and Configuring HASS.Agent
- Download HASS.Agent: Go to the official HASS.Agent GitHub page and download the latest installer.
- Installation: Run the downloaded file and follow the wizard. It’s a standard Windows installation.
- Initial Setup: When you open HASS.Agent for the first time, it will prompt you to configure the connection to Home Assistant.
- Home Assistant API: Enter your Home Assistant URL (e.g.,
http://192.168.1.100:8123) and generate a Long-Lived Access Token from your Home Assistant profile to paste here. - MQTT: Enter the IP address of your Home Assistant instance (or wherever your broker is), the port (usually 1883), and the username and password for your MQTT broker. If you don’t have one set up, we highly recommend installing the Mosquitto Broker add-on.
- Home Assistant API: Enter your Home Assistant URL (e.g.,
- Enable Sensors and Commands: In the HASS.Agent interface, navigate through the “Sensors” and “Commands” tabs. You’ll see a massive list of potential sensors (CPU usage, RAM, temperature, webcam status, active window, etc.) and commands (shutdown, sleep, hibernate, send notification, run script). Enable the ones you’re interested in. To get started, we recommend:
- Sensors:
CpuUsageSensor,MemoryUsageSensor,CurrentClockSpeedSensor,GpuTemperatureSensor,ActiveWindowSensor. - Commands:
ShutdownCommand,RebootCommand,SleepCommand,LockCommand,CustomCommand(for running programs).
- Sensors:
- Save and Activate: Save the configuration. HASS.Agent will immediately start publishing all this information to Home Assistant.
Integrating with Home Assistant
Thanks to MQTT auto-discovery, this is where the magic happens. Navigate to Settings > Devices & Services. Under the MQTT integration, you should see a new device named after your PC. It’s that easy!
Inside this device, you’ll find all the entities you enabled in HASS.Agent: sensors, and buttons for the commands. You can now add them to your dashboard.
Creating a PC Control Panel on Your Dashboard
You can create a simple card to have all your PC’s info and controls in one place. An “Entities Card” is a great starting point:
type: entities
title: Office PC Control
entities:
  - entity: sensor.my_office_pc_cpu_usage
    name: CPU Usage
  - entity: sensor.my_office_pc_memory_usage
    name: RAM Usage
  - entity: sensor.my_office_pc_gpu_temperature
    name: GPU Temp
  - entity: sensor.my_office_pc_active_window
    name: Active Window
  - type: buttons
    entities:
      - entity: button.my_office_pc_sleep
        name: Sleep
      - entity: button.my_office_pc_reboot
        name: Reboot
      - entity: button.my_office_pc_shutdown
        name: Shutdown
For turning the PC on, which relies on Wake on LAN, we’ll create a combined switch. Go to Settings > Devices & Services > Helpers and create a new “Template” Switch:
- Name: Office PC
- State template:
{{ is_state('binary_sensor.my_office_pc_active', 'on') }} - Turn on action: Call service
wake_on_lan.send_magic_packetwith your MAC address. - Turn off action: Call service
button.presson thebutton.my_office_pc_shutdownentity. - Icon:
mdi:desktop-tower-monitor
Unleashing the Power: Smart Automation Examples
This is where the integration truly shines. It’s no longer just about remotely shutting down your PC; it’s about doing it intelligently.
Example 1: Shut Down the PC When the Office is Empty
This automation requires a presence or motion sensor (like a Zigbee mmWave or PIR sensor) in the room.
alias: Shutdown Office PC when empty
trigger:
  - platform: state
    entity_id: binary_sensor.office_presence_sensor
    to: 'off'
    for:
      minutes: 30
condition:
  - condition: state
    entity_id: switch.office_pc
    state: 'on'
action:
  - service: button.press
    target:
      entity_id: button.my_office_pc_shutdown
mode: single
Example 2: Power On Your PC When You Arrive Home on Workdays
This uses your Home Assistant mobile app’s location tracking and the built-in Workday helper.
alias: Power on PC on workday arrival
trigger:
  - platform: zone
    entity_id: person.your_name
    zone: zone.home
    event: enter
condition:
  - condition: state
    entity_id: binary_sensor.workday_sensor
    state: 'on'
  - condition: state
    entity_id: switch.office_pc
    state: 'off'
action:
  - service: switch.turn_on
    target:
      entity_id: switch.office_pc
mode: single
Troubleshooting Common Issues (FAQ)
- My PC won’t turn on with WoL. What’s wrong?
- First, double-check that Fast Startup is disabled and WoL is enabled in the BIOS. WoL is significantly more reliable over an Ethernet cable than Wi-Fi; some Wi-Fi cards don’t support it correctly from a fully powered-off state. Also, verify that the MAC address is correct and uses colons (
:), not dashes (-). - HASS.Agent isn’t connecting to MQTT, or my entities aren’t showing up.
- Verify the IP address, port, username, and password for your MQTT broker are correct in HASS.Agent. Make sure you don’t have a firewall on your PC or router blocking port 1883. Check the logs for the Mosquitto Broker add-on in Home Assistant for any failed connection attempts.
- The Windows firewall is blocking the connection.
- During installation, HASS.Agent should have requested permission to create a firewall rule. If you denied it, go to “Windows Security” > “Firewall & network protection” > “Allow an app through firewall” and manually add HASS.Agent to the list, allowing it on private networks.
Voice Control: Integrating with Google Home & Alexa
Once you have the switch.office_pc helper working, you can expose it to your voice assistants. If you use Nabu Casa, simply select the entity in the cloud configuration to have it appear in Google Home or Alexa. If you use a manual setup, make sure to include the switch in your exposed entities. After that, you’ll be able to say, “Hey Google, turn on the office PC,” and watch the magic happen.