
Last updated on January 28, 2026
If you have a Time-of-Use (TOU) or tiered electricity plan, getting accurate cost tracking in Home Assistant can feel like a chore. While users with variable, spot-price rates often have official integrations that update hourly, the rest of us need a custom solution. The good news? In 2026, creating a dynamic Home Assistant Time of Use sensor for your fixed-rate plan is easier and more powerful than ever.
In this definitive guide, I’ll show you how to ditch the old, clunky methods and build a price sensor that’s fully integrated with the Energy Dashboard. Say goodbye to editing YAML files every time your utility changes its rates.
Why Upgrade? The End of ‘Legacy’ Template Sensors
Until recently, the go-to method for this was configuring sensors directly in `sensors.yaml` using the `platform: template` format. However, since late 2025, Home Assistant has officially deprecated this method. If you’re still using this old configuration, it’s critical to migrate now before it stops working. This tutorial exclusively uses the modern, recommended methods for 2026.
Step 1 (Required): Set Up the Workday Sensor
Our price logic needs to know if today is a weekday, weekend, or public holiday. For this, we’ll use the official Workday integration. This is a non-negotiable prerequisite.
1. Go to Settings > Devices & Services > Add Integration.
2. Search for and select “Workday”.
3. In the configuration dialog, enter the following:
- Country: `US`
- Subdivision (Optional): Your state’s two-letter abbreviation (e.g., `CA` for California, `NY` for New York) to include regional holidays.
4. Confirm the setup. This will create a new entity called `binary_sensor.workday_sensor`, which will be `on` for workdays and `off` for weekends and holidays.
Step 2: Make Your Prices Dynamic with Helpers
To avoid editing code every time your rates change, we’ll create “Helper” entities. This lets you adjust your electricity prices right from the Home Assistant dashboard.
1. Navigate to Settings > Devices & Services > Helpers.
2. Click “Create Helper” and select “Number”.
3. Create three helpers, one for each of your Time-of-Use tiers. Here’s a common example:
- Name: Peak Electricity Price
Icon: `mdi:flash-alert`
Minimum value: 0
Maximum value: 2
Step size: 0.001
Unit of measurement: `$/kWh` - Name: Mid-Peak Electricity Price
Icon: `mdi:flash`
… (same configuration) - Name: Off-Peak Electricity Price
Icon: `mdi:flash-off`
… (same configuration)
Once created, you’ll have three entities (e.g., `input_number.peak_electricity_price`) that you can add to a dashboard for easy price adjustments.

Step 3: Create the Price Sensor (The Recommended UI Method)
Now that we have our prices and workday sensor, we’ll create the main sensor using a Template Helper. This is the cleanest and officially recommended approach in 2026.
1. Go back to Settings > Devices & Services > Helpers.
2. Click “Create Helper” and choose “Template”.
3. Select “A template for a sensor.”
4. Fill out the fields as follows:
- Name: Current Electricity Price
- State template (paste this code):
{% set peak_price = states('input_number.peak_electricity_price') | float(0) %}
{% set mid_peak_price = states('input_number.mid_peak_electricity_price') | float(0) %}
{% set off_peak_price = states('input_number.off_peak_electricity_price') | float(0) %}

{# Weekends and Holidays are always Off-Peak #}
{% if is_state('binary_sensor.workday_sensor', 'off') %}
  {{ off_peak_price }}
{% else %}
  {# Weekday Logic - **ADJUST HOURS TO MATCH YOUR UTILITY PLAN** #}
  {% set current_hour = now().hour %}
  {% if 0 <= current_hour < 8 %}
    {{ off_peak_price }}  {# 12am - 8am #}
  {% elif 8 <= current_hour < 10 %}
    {{ mid_peak_price }} {# 8am - 10am #}
  {% elif 10 <= current_hour < 14 %}
    {{ peak_price }}      {# 10am - 2pm #}
  {% elif 14 <= current_hour < 18 %}
    {{ mid_peak_price }} {# 2pm - 6pm #}
  {% elif 18 <= current_hour < 22 %}
    {{ peak_price }}      {# 6pm - 10pm #}
  {% else %}
    {{ off_peak_price }}  {# 10pm - 12am #}
  {% endif %}
{% endif %}- Unit of measurement: `$/kWh` (Absolutely essential!)
- Device class: Monetary (This provides the correct currency icon)
- State class: Measurement (Critical for the Energy Dashboard!)
5. Click “Create”. Your `sensor.current_electricity_price` entity is now live!
Pro Tip: Handling Different Weekend Rates
Some utility plans have different rates for Saturday and Sunday. You can easily adapt the template for this. For example:
... (define prices first) ...
{% if now().isoweekday() == 7 %} {# Sunday #}
  {{ sunday_price }}
{% elif now().isoweekday() == 6 %} {# Saturday #}
  {{ saturday_price }}
{% elif is_state('binary_sensor.workday_sensor', 'off') %} {# Other Holidays #}
  {{ off_peak_price }}
{% else %}
... (rest of the weekday logic) ...
{% endif %}
Just remember to create the corresponding `input_number` helpers for `sunday_price` and `saturday_price`.
Alternative Method: Modern YAML Configuration
If you prefer managing your templates in `configuration.yaml`, this is the modern syntax you must use. Do not use `platform: template` under the `sensor:` key.
Add the following block to your `configuration.yaml` file:
template:
  - sensor:
      - name: "Current Electricity Price YAML"
        unique_id: current_electricity_price_yaml_2026
        unit_of_measurement: "$/kWh"
        device_class: monetary
        state_class: measurement
        state: >-
          {% set peak_price = states('input_number.peak_electricity_price') | float(0) %}
          {% set mid_peak_price = states('input_number.mid_peak_electricity_price') | float(0) %}
          {% set off_peak_price = states('input_number.off_peak_electricity_price') | float(0) %}

          {% if is_state('binary_sensor.workday_sensor', 'off') %}
            {{ off_peak_price }}
          {% else %}
            {% set current_hour = now().hour %}
            {% if 0 <= current_hour < 8 %}
              {{ off_peak_price }}
            {% elif 8 <= current_hour < 10 %}
              {{ mid_peak_price }}
            {% elif 10 <= current_hour < 14 %}
              {{ peak_price }}
            {% elif 14 <= current_hour < 18 %}
              {{ mid_peak_price }}
            {% elif 18 <= current_hour < 22 %}
              {{ peak_price }}
            {% else %}
              {{ off_peak_price }}
            {% endif %}
          {% endif %}
After saving, go to Settings > System > Restart and click "Reload Template Entities."
Method Comparison: UI vs. YAML
| Feature | UI Method (Helper) | Modern YAML Method |
|---|---|---|
| Ease of Use | Very high. Everything is managed through the web interface, no file editing required. | Medium. Requires editing `configuration.yaml` and reloading templates. |
| Maintenance | Simple. The template logic can be edited directly from the Helper in the UI. | Requires file access for any changes to the template logic. |
| Recommended For... | The vast majority of users in 2026. This is the new standard. | Power users who prefer to have their entire configuration centralized in code. |
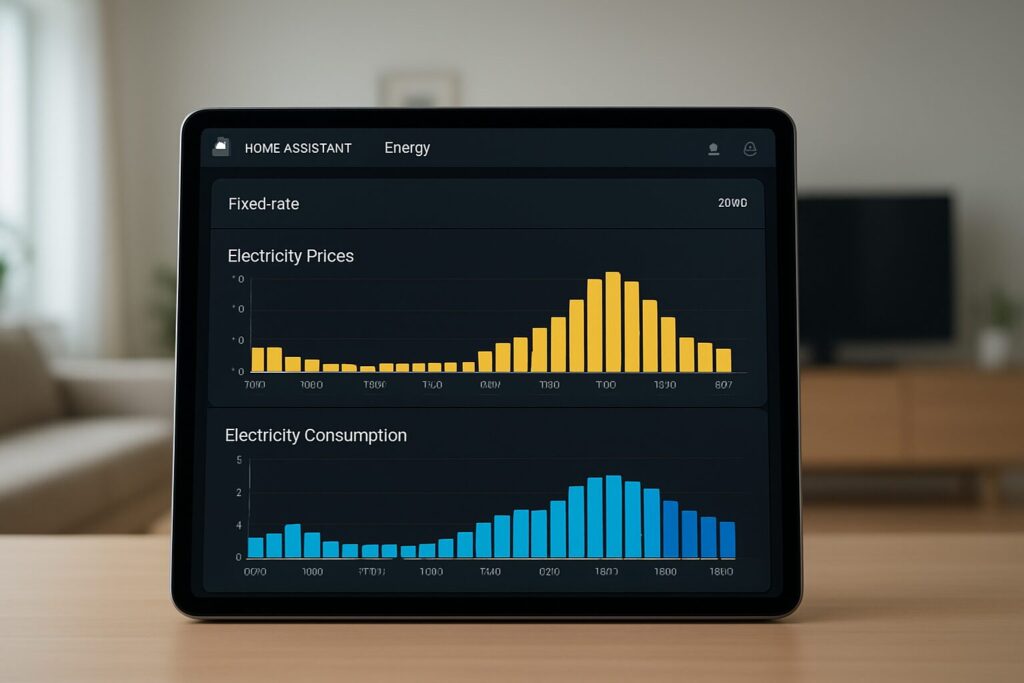
Final Step: Integrate with the Energy Dashboard
This is the payoff: seeing the actual cost of your energy consumption. With your sensor correctly configured (with `unit_of_measurement`, `device_class`, and `state_class`), integration is a breeze.
1. Go to Settings > Dashboards > Energy.
2. In the "Electricity grid" section, find the "Electricity price" setting.
3. Select the option "Use an entity with the current price".
4. From the dropdown menu, choose the sensor you created (e.g., `sensor.current_electricity_price`).
5. Save your configuration.
That's it! From now on, the Energy Dashboard will use your custom sensor to calculate the cost of grid-consumed electricity, giving you a precise breakdown of your spending.

FAQ and Common Troubleshooting
- My sensor shows 'unknown' or an error. What's wrong?
- Go to Developer Tools > Template. Paste your template code into the editor to check for errors. The most common mistakes are incorrect `entity_id`s for your `input_number` helpers or the `binary_sensor.workday_sensor`. Double-check that the names match exactly.
- The sensor isn't showing up in the Energy Dashboard list.
- This is the #1 problem people face. The cause is almost always a missing `unit_of_measurement: '$/kWh'` and, most importantly, a missing `state_class: 'measurement'`. If you created the sensor via the UI, edit the Helper and ensure these attributes are correctly set. If you used YAML, add them to your configuration, reload templates, and wait. It can take up to an hour for Home Assistant to detect the corrected sensor.
- How do I change the time slots for my specific plan?
- You need to edit the `if/elif/else` logic inside your template. For example, if your peak period is from 1 PM to 7 PM (13:00 to 19:00), you would change the lines to something like `{% elif 13 <= current_hour < 19 %}`. Check your utility company's website for your exact TOU schedule and adjust the numbers accordingly.
With this updated 2026 guide, you have everything you need to perfectly integrate your Time-of-Use electricity plan into Home Assistant and take full control of your energy consumption and costs.