
As an Amazon Associate, I earn from qualifying purchases. En calidad de Afiliado de Amazon, obtengo ingresos por las compras adscritas que cumplen los requisitos aplicables. If you buy through these links, the price is the same for you and Amazon pays me a small commission that helps keep Tecnoyfoto running.
Last updated on February 2, 2026
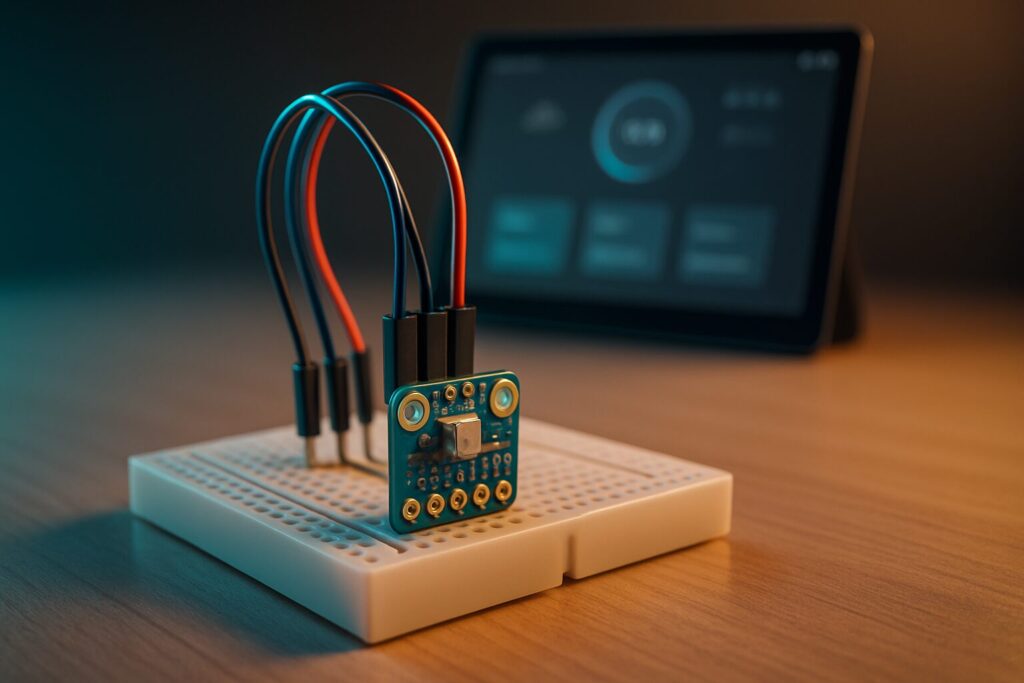
In the fast-paced world of IoT in 2026, some sensors achieve legendary status for their reliability, accuracy, and value. The BME280 is, without a doubt, one of them. If you want to give your next project the ability to sense the world around it, this little powerhouse from Bosch is your go-to choice. These sensors come pre-calibrated, are a breeze to use, and require no extra components, letting you measure temperature, humidity, barometric pressure, and approximate altitude right out of the box. This BME280 guide will walk you through everything you need to know.
While the BME280 is a fantastic all-in-one sensor, it’s smart to know the alternatives for different use cases. For example, the DHT22 sensors are a budget-friendly option if you only need temperature and humidity, while the BMP280 is its little brother, measuring temperature and pressure but skipping humidity. If you need higher humidity accuracy, the HTU21D remains an excellent choice.

At the heart of the module is the BME280 digital sensor, a component that, despite being on the market for years, is still a benchmark thanks to its robust German engineering. It’s the successor to classics like the BMP180, BMP085, and BMP183, surpassing them in both precision and features.
This precision sensor can measure relative humidity from 0 to 100% with ±3% accuracy, barometric pressure from 300 to 1100 hPa with ±1 hPa absolute accuracy, and temperature from -40°C to 85°C (-40°F to 185°F) with ±1.0°C accuracy. The pressure measurements are so stable (with a low altitude noise of just 0.25 m) that you can use it as an altimeter with an accuracy of ±1 meter (about 3 feet), making it perfect for drone projects or DIY weather stations.
BME280 Technical Specifications
To give you a clear overview of its capabilities, I’ve summarized the BME280 specs in the table below. If you need the nitty-gritty details, I recommend searching for the official BME280 datasheet from Bosch Sensortec.
| Parameter | Value |
| Operating Voltage | 1.71V to 3.6V (Chip) / 3.3V or 5V (Modules w/ regulator) |
| Communication Interface | I²C and SPI |
| Temperature Range | -40°C to +85°C (-40°F to 185°F) |
| Temperature Accuracy | ±1.0°C (±0.5°C at 25°C) |
| Humidity Range | 0% to 100% RH |
| Humidity Accuracy | ±3% RH |
| Pressure Range | 300 to 1100 hPa |
| Pressure Accuracy | ±1 hPa |
| Default I²C Address | 0x76 or 0x77 (configurable) |
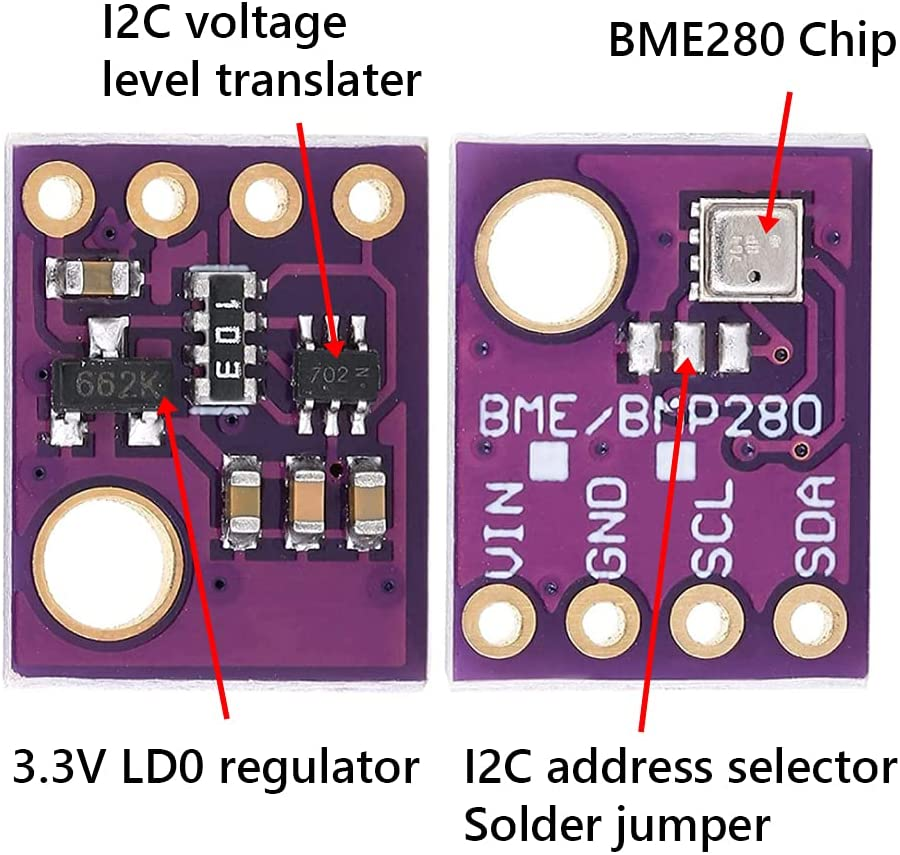
Heads-Up on Voltage! I’ve seen a ton of BME280 modules that include an onboard voltage regulator (like the LM6206) and level shifters, which lets you safely power them with 5V. However, some barebones models are 3.3V only. Always double-check the silkscreen on your board before hooking it up to avoid frying the sensor.
Recommended Components
- Development Board: ESP32Affiliate link (any variant like S3, C3), ESP8266Affiliate link, Wemos D1 MiniAffiliate link, or a classic Arduino UNO/Nano.
- BME280 SensorAffiliate link on a breakout board.
- Jumper Wires (Dupont)Affiliate link. You can even learn to make your own custom cables for a pro finish.
- 5V Power SupplyAffiliate link (a simple Micro USB or USB-C cable connected to your PC is enough to get started).
Pinout and I²C Interface Setup
Most BME280 modules expose 4 or 6 pins. For I²C communication, which is the most common method, we only need four:
- VIN: Power for the module (usually 3.3V or 5V).
- GND: Ground.
- SCL: The clock pin for the I²C interface.
- SDA: The data pin for the I²C interface.
One of the great features of the BME280 is its changeable I²C address, allowing you to use two sensors on the same bus. The default address is usually 0x76. To change it to 0x77, look for a small solder jumper on the board. Typically, you just need to carefully cut a thin trace with a hobby knife and then solder the alternative jumper pad.
BME280 Tutorial with ESPHome and Home Assistant
For smart home enthusiasts, integrating the BME280 into Home Assistant via ESPHome is incredibly straightforward. First, wire up the sensor to your ESP32 or ESP8266 board.

Next, add the following code to your device’s YAML configuration in ESPHome:
# 1. Define the I²C bus
# The sda and scl pins may vary depending on your board.
# For ESP8266/Wemos D1 Mini, they're usually GPIO4 (D2) and GPIO5 (D1).
# For ESP32, they're typically GPIO21 (SDA) and GPIO22 (SCL).
i2c:
  sda: GPIO4
  scl: GPIO5
  scan: true

# 2. Configure the BME280 sensor
sensor:
  - platform: bme280
    address: 0x76  # Change to 0x77 if you modified the jumper
    update_interval: 60s
    temperature:
      name: "Living Room Temperature"
      oversampling: 16x
    pressure:
      name: "Living Room Pressure"
    humidity:
      name: "Living Room Humidity"
    # Optional: Filter to smooth out readings
    iir_filter: 4x
Once you compile and upload the firmware, the new sensor entities will pop up automatically in Home Assistant, ready to be used in your dashboards and automations.
BME280 Tutorial with Arduino
If you prefer the Arduino ecosystem, the process is just as simple thanks to readily available libraries. My go-to recommendation is the “Adafruit BME280 Library” paired with the “Adafruit Unified Sensor” library.
Connections for Arduino UNO:
- VIN → 5V
- GND → GND
- SDA → A4
- SCL → A5
You can install these libraries directly from the Library Manager in the Arduino IDE. Once installed, you can use this example sketch to start seeing readings in the Serial Monitor:
#include <Wire.h>
#include <Adafruit_Sensor.h>
#include <Adafruit_BME280.h>

#define SEALEVELPRESSURE_HPA (1013.25)

Adafruit_BME280 bme; // I2C

void setup() {
  Serial.begin(9600);
  Serial.println(F("BME280 Sensor Test"));

  if (!bme.begin(0x76)) {
    Serial.println(F("Could not find a valid BME280 sensor, check wiring!"));
    while (1);
  }
}

void loop() {
    Serial.print("Temperature = ");
    Serial.print(bme.readTemperature());
    Serial.println(" *C");

    Serial.print("Pressure = ");
    Serial.print(bme.readPressure() / 100.0F);
    Serial.println(" hPa");

    Serial.print("Approx. Altitude = ");
    Serial.print(bme.readAltitude(SEALEVELPRESSURE_HPA));
    Serial.println(" m");

    Serial.print("Humidity = ");
    Serial.print(bme.readHumidity());
    Serial.println(" %");

    Serial.println();
    delay(2000);
}
Project Ideas and Smart Home Applications
The BME280’s versatility makes it perfect for a countless number of projects. Here are a few ideas to get you inspired:
- DIY Weather Station: This is the classic BME280 project. Combine it with a rain gauge and an anemometer to build your own weather station fully integrated with Home Assistant.
- Smart Climate Control: Use the temperature and humidity readings to create more efficient automations for your air conditioning or heating. You can even calculate the dew point to prevent condensation on windows.
- Indoor Air Quality Monitor: While it doesn’t measure VOCs, humidity is a key factor in air quality. High humidity can lead to mold growth. You can automate a bathroom exhaust fan to turn on whenever humidity spikes.
- Altimeter for Drones or Model Rockets: Its precise pressure sensing makes it viable for aeromodelling and amateur rocketry projects to log the maximum altitude reached.
Troubleshooting and FAQ
- My microcontroller can’t find the sensor on the I²C bus.
- First, triple-check your wiring. A loose wire or a connection to the wrong pin is the most common culprit. Second, confirm the I²C address (0x76 or 0x77). Use an “I2C Scanner” sketch to have your Arduino or ESP tell you which addresses are active on the bus.
- My temperature readings seem too high.
- The BME280 is sensitive to self-heating and heat from nearby components. Make sure it’s not placed right next to your ESP32/ESP8266 processor, as those chips get warm. Placing the sensor a few inches away with jumper wires or putting it in an enclosure with good ventilation will dramatically improve accuracy.
- What’s the difference between the BME280 and the BMP280?
- This is a very common point of confusion. The BMP280 measures temperature and barometric pressure. The BME280 (the ‘E’ stands for ‘Environmental’) adds a humidity sensor to the mix. If you need all three metrics, make sure you’re buying the BME280.
BME280 Sensor Price in 2026
One of the best things about this sensor is that the BME280’s price has remained incredibly competitive. As of 2026, you can find modules ranging from $4 to $15, depending on the seller and whether you buy them individually or in multi-packs. As always, be wary of clones and double-check that you’re getting the BME280, not the BMP280, if you need humidity readings.
Disclaimer
This guide assumes the reader has intermediate knowledge and experience with electronic prototyping, soldering, programming, and safe handling practices. As with any electronics project, there are multiple ways to achieve the same result. While I have prepared this guide with the utmost care, I offer no warranties and assume no liability for the outcome of following the instructions described herein.