
As an Amazon Associate, I earn from qualifying purchases. En calidad de Afiliado de Amazon, obtengo ingresos por las compras adscritas que cumplen los requisitos aplicables. If you buy through these links, the price is the same for you and Amazon pays me a small commission that helps keep Tecnoyfoto running.

Last updated on August 1, 2026
The BME280 is a compact Bosch environmental sensor that measures temperature, relative humidity, and barometric pressure. Mounted on a suitable breakout board, it is an affordable way to add reliable environmental data to Arduino, ESP32, ESP8266, ESPHome, and Home Assistant projects. This updated BME280 guide explains the specifications, safe wiring, current ESPHome configuration, Arduino code, limitations, and troubleshooting.
The BME280 is not the only option. A DHT22 can be sufficient when you only need basic temperature and humidity, while the BMP280 measures temperature and pressure but not humidity. Sensors such as the HTU21D can offer better humidity accuracy for projects where pressure is unnecessary.
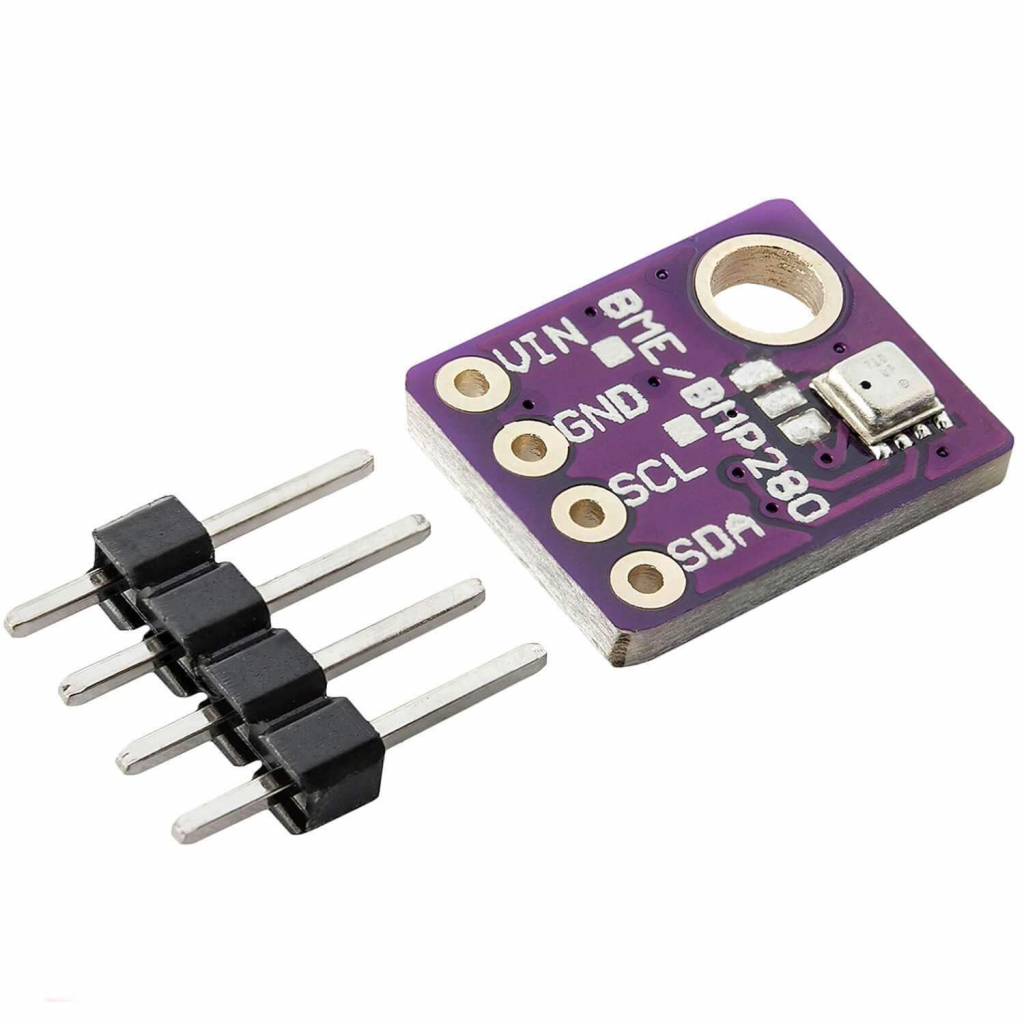
At the heart of the module is the BME280 digital sensor, a component that, despite being on the market for years, is still a benchmark thanks to its robust German engineering. It’s the successor to classics like the BMP180, BMP085, and BMP183, surpassing them in both precision and features.
The BME280 operates across 0–100% relative humidity, 300–1100 hPa, and -40°C to 85°C. Bosch specifies ±3% RH humidity accuracy under its stated test conditions and ±1 hPa absolute pressure accuracy over the specified range. Its pressure sensitivity can detect small relative altitude changes, but this does not mean that it provides absolute altitude with ±1 metre accuracy. Absolute altitude depends on the sea-level reference pressure, weather, calibration, and installation.
BME280 Technical Specifications
The table summarizes the main specifications. For design limits, accuracy conditions, register details, and recommended wiring, always consult the official BME280 documentation from Bosch Sensortec.
| Parameter | Value |
| Operating Voltage | VDD: 1.71–3.6V; VDDIO: 1.2–3.6V. A breakout may accept 5V only if specified by its manufacturer. |
| Communication Interface | I²C and SPI |
| Temperature Range | -40°C to +85°C (-40°F to 185°F) |
| Temperature Accuracy | ±1.0°C (±0.5°C at 25°C) |
| Humidity Range | 0% to 100% RH |
| Humidity Accuracy | ±3% RH |
| Pressure Range | 300 to 1100 hPa |
| Pressure Accuracy | ±1 hPa |
| Available I²C Addresses | 0x76 or 0x77, selected by SDO or the breakout-board configuration |
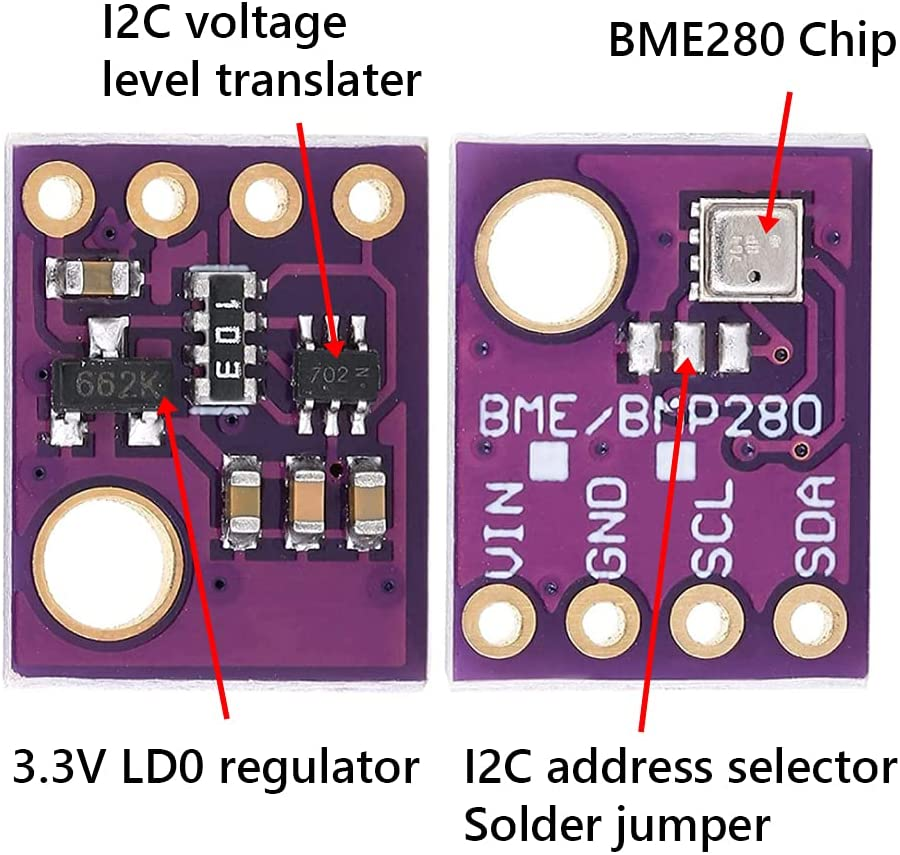
Voltage warning: the BME280 chip itself is not 5V tolerant. Some breakout boards add a regulator and bidirectional level shifting, but many inexpensive boards do not. Use 3.3V unless the documentation for your exact module explicitly confirms both 5V power and 5V logic compatibility. The silkscreen alone is not always sufficient evidence.
Recommended Components
- Development Board: ESP32Affiliate link (any variant like S3, C3), ESP8266Affiliate link, Wemos D1 MiniAffiliate link, or a classic Arduino UNO/Nano.
- BME280 SensorAffiliate link on a breakout board.
- Jumper Wires (Dupont)Affiliate link. You can even learn to make your own custom cables for a pro finish.
- USB power supplyAffiliate link for the development board. Power the sensor from the correct 3.3V or verified VIN pin on that board.
Pinout and I²C Interface Setup
Most BME280 modules expose 4 or 6 pins. For I²C communication, which is the most common method, we only need four:
- VIN/VCC: Power for the module. Use 3.3V unless the exact breakout is documented as 5V compatible.
- GND: Ground.
- SCL: The clock pin for the I²C interface.
- SDA: The data pin for the I²C interface.
The BME280 supports 0x76 and 0x77. The address is selected through SDO, but the default and the way to change it depend on the breakout board. Some boards provide an ADDR solder jumper; others expose SDO directly. Run an I²C scan first and follow the documentation for your module. Do not cut a trace unless its manufacturer specifically instructs you to do so.
BME280 Tutorial with ESPHome and Home Assistant
For smart home enthusiasts, integrating the BME280 into Home Assistant via ESPHome is incredibly straightforward. First, wire up the sensor to your ESP32 or ESP8266 board.
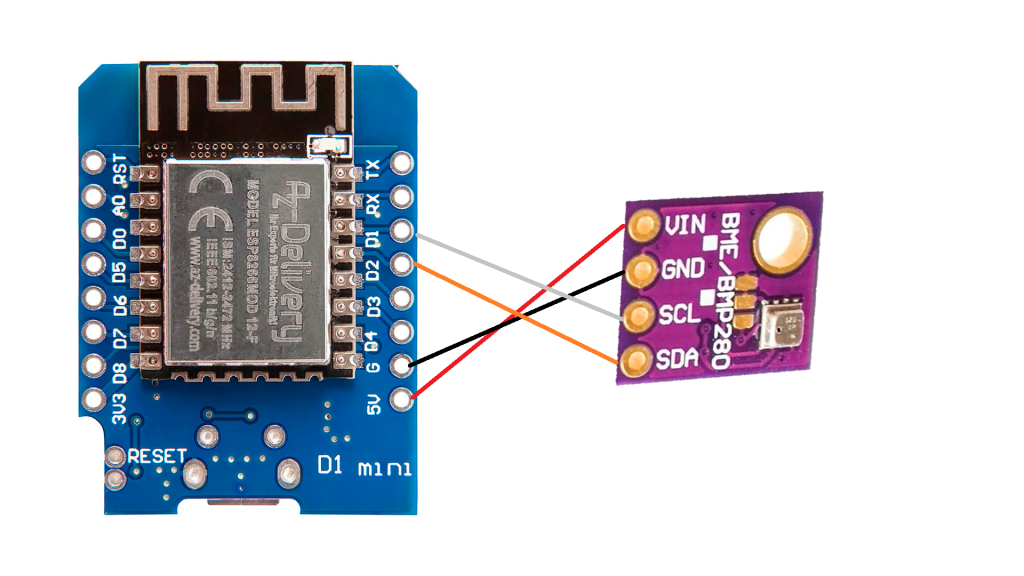
Next, add the following code to your device’s YAML configuration. Since ESPHome 2024.2, I²C devices must use bme280_i2c; the older bme280 platform name no longer compiles. Check the current ESPHome BME280 documentation if you use a newer release.
# 1. Define the I²C bus
# The sda and scl pins may vary depending on your board.
# For ESP8266/Wemos D1 Mini, they're usually GPIO4 (D2) and GPIO5 (D1).
# For ESP32, they're typically GPIO21 (SDA) and GPIO22 (SCL).
i2c:
  sda: GPIO4
  scl: GPIO5
  scan: true

# 2. Configure the BME280 sensor
sensor:
  - platform: bme280_i2c
    address: 0x76  # Use the address reported by the I²C scan: 0x76 or 0x77
    update_interval: 60s
    temperature:
      name: "Living Room Temperature"
      oversampling: 16x
    pressure:
      name: "Living Room Pressure"
    humidity:
      name: "Living Room Humidity"
    # Optional: Filter to smooth out readings
    iir_filter: 4x
Once you compile and upload the firmware, the new sensor entities will pop up automatically in Home Assistant, ready to be used in your dashboards and automations.
BME280 Tutorial with Arduino
For Arduino, install the Adafruit BME280 Library and Adafruit Unified Sensor from the Library Manager. The following wiring assumes I²C mode.
Connections for Arduino UNO:
- VIN/VCC → 3.3V for an unregulated module; use 5V only with a breakout explicitly designed for 5V power and logic.
- GND → GND
- SDA → A4
- SCL → A5
A bare 3.3V module must not be connected directly to 5V I²C logic. Use a bidirectional level shifter or a breakout that includes one.
You can install these libraries directly from the Library Manager in the Arduino IDE. Once installed, you can use this example sketch to start seeing readings in the Serial Monitor:
#include <Wire.h>
#include <Adafruit_Sensor.h>
#include <Adafruit_BME280.h>

#define SEALEVELPRESSURE_HPA (1013.25) // Replace with the current local sea-level pressure

Adafruit_BME280 bme; // I2C

void setup() {
  Serial.begin(9600);
  Serial.println(F("BME280 Sensor Test"));

  if (!bme.begin(0x76)) {
    Serial.println(F("Could not find a valid BME280 sensor, check wiring!"));
    while (1);
  }
}

void loop() {
    Serial.print("Temperature = ");
    Serial.print(bme.readTemperature());
    Serial.println(" *C");

    Serial.print("Pressure = ");
    Serial.print(bme.readPressure() / 100.0F);
    Serial.println(" hPa");

    Serial.print("Approx. Altitude = ");
    Serial.print(bme.readAltitude(SEALEVELPRESSURE_HPA));
    Serial.println(" m");

    Serial.print("Humidity = ");
    Serial.print(bme.readHumidity());
    Serial.println(" %");

    Serial.println();
    delay(2000);
}
Altitude calibration: 1013.25 is the standard-atmosphere reference, not a universal local value. Replace it with the current sea-level pressure for your location if you want a meaningful altitude estimate. Weather changes will still move the result, so the BME280 is more reliable for relative altitude changes than for absolute elevation.
Project Ideas and Smart Home Applications
The BME280’s versatility makes it perfect for a countless number of projects. Here are a few ideas to get you inspired:
- DIY Weather Station: This is the classic BME280 project. Combine it with a rain gauge and an anemometer to build your own weather station fully integrated with Home Assistant.
- Smart Climate Control: Use the temperature and humidity readings to create more efficient automations for your air conditioning or heating. You can even calculate the dew point to prevent condensation on windows.
- Comfort and condensation monitor: The BME280 does not measure CO₂, VOCs, or particulate matter, so it is not a complete indoor-air-quality sensor. It can still help track humidity, condensation risk, and ventilation needs.
- Relative altimeter: After calibration, pressure changes can track climbs and descents in drones or model rockets. Do not treat the result as survey-grade absolute altitude.
Troubleshooting and FAQ
Why can’t my microcontroller find the BME280?
Check power, ground, SDA, and SCL first. Then use the I²C scan already enabled in the ESPHome example, or an Arduino I²C scanner, to determine whether the module is at 0x76 or 0x77. In I²C mode, Bosch also recommends keeping CSB high; some boards handle this internally.
Why are the temperature readings too high?
Heat from an ESP32, voltage regulator, display, or enclosure can warm the sensor. Place the BME280 away from heat sources and allow air to circulate around its vent. Compare it with a trusted reference only after both sensors have stabilized together.
What is the difference between the BME280 and BMP280?
The BMP280 measures temperature and barometric pressure. The BME280 adds relative humidity. Check the detected chip and the product marking because some inexpensive listings confuse the two models.
Can I power every BME280 module from 5V?
No. Only use 5V when the documentation for the exact breakout confirms a regulator and 5V-safe logic. Otherwise use 3.3V and appropriate level shifting.
BME280 Sensor Price in 2026
BME280 breakout modules commonly sell for approximately €4–€15, depending on the board design, seller, and pack size. Verify that the listing is genuinely for a BME280 if you need humidity, and check whether the breakout supports 3.3V only or includes 5V-safe power and logic.
Check the BME280 module and current price on Amazon SpainAffiliate link.
This article contains affiliate links. If you buy through them, the price is the same for you and the store may pay Tecnoyfoto a small commission that helps support the website.
Disclaimer
This guide assumes the reader has intermediate knowledge and experience with electronic prototyping, soldering, programming, and safe handling practices. As with any electronics project, there are multiple ways to achieve the same result. While I have prepared this guide with the utmost care, I offer no warranties and assume no liability for the outcome of following the instructions described herein.
Continue reading
Next related guide · 6 min read
BMP280 with ESP32 and ESPHome: Updated I2C Guide
Updated August 2, 2026. A BMP280 with ESP32 and ESPHome is a straightforward project for measuring atmospheric pressure and the sensor's internal temperature in…
Continue with this article