

Last updated on February 3, 2026
Master Home Assistant Calendar Automations: The Ultimate 2026 Guide
Home Assistant calendar automations are one of the most powerful—yet surprisingly simple—ways to take your smart home to the next level. They let you run actions based on the start or end of a scheduled event, with the flexibility to add a time offset to anticipate or react to those events. In this updated 2026 guide, we’ll dive deep into mastering calendar triggers to create a truly proactive smart home.
The best part about this feature is its versatility. It’s compatible with both the local calendar you can manage entirely within Home Assistant and external services like the Google Calendar integration or other CalDAV-compatible calendars. This opens up a world of possibilities: from turning on the lights 15 minutes before your workday ends to receiving custom notifications for important events.
Understanding Calendar Triggers: The Core Concepts
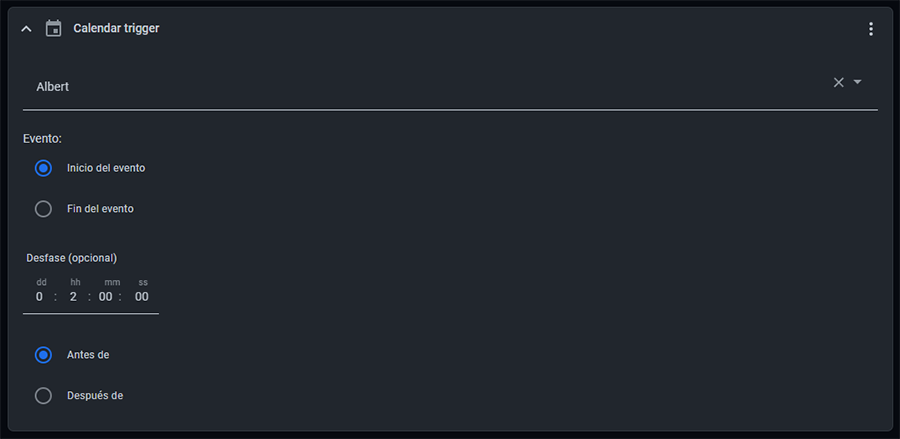
The central concept here is the “trigger.” In any automation, the trigger is the condition that kicks off the sequence of actions. For calendars, we have two primary events we can use to trigger an automation:
start: The automation runs when a calendar event begins.end: The automation runs when a calendar event finishes.
On top of that, we can use the offset parameter to fine-tune the exact trigger time. For example, an offset of -00:15:00 on a start event will make the automation run 15 minutes before the event begins. A positive offset (00:15:00) would run it 15 minutes after.
Creating Your First Calendar Automation
In 2026, Home Assistant offers a rock-solid visual editor that makes creating automations a breeze, no YAML required. However, understanding the YAML structure is still incredibly useful for more complex setups and for sharing your work with the community.
Method 1: Using the UI (Recommended for Beginners)
- Navigate to Settings > Automations & Scenes.
- Click the blue “Create Automation” button.
- Select “Create new automation”.
- In the “Triggers” section, click “+ Add Trigger”.
- From the dropdown menu, choose “Calendar”.
- Configure the options:
- Entity: Select your calendar’s
entity_id(e.g.,calendar.personal). - Event: Choose whether to trigger at the Start or End of the event.
- Offset: Enter the time offset if needed (e.g.,
-00:15:00).
- Entity: Select your calendar’s
- Add the conditions and actions you want to run.
Method 2: Editing in YAML
If you prefer total control, you can define the trigger directly in YAML. Here’s the basic structure:
automation:
  - trigger:
      - platform: calendar
        # Possible values: start, end
        event: start
        # The entity_id of your calendar
        entity_id: calendar.personal
        # Optional time offset to trigger before or after the event
        offset: "-00:15:00"
    # ... rest of your automation (conditions and actions)
Heads-up on Execution Mode: It’s best to avoid the single execution mode for calendar automations. If multiple events overlap at the same time, only one instance will run. Use modes like queued or parallel to ensure every trigger fires correctly. Also, keep in mind that calendars typically refresh every 15 minutes, so when testing, create your events more than 15 minutes in the future.
Real-World Calendar Automation Examples
Let’s see how we can apply these concepts to solve real problems. I’ve put together a few examples, from basic to advanced.
Example 1: Simple Event Notification
This automation sends a persistent notification in Home Assistant at the start of any event in the calendar.personal calendar.
automation:
  - alias: "Calendar Event Notification"
    trigger:
      - platform: calendar
        event: start
        entity_id: calendar.personal
    action:
      - service: persistent_notification.create
        data:
          message: "Event: {{ trigger.calendar_event.summary }} at {{ as_timestamp(trigger.calendar_event.start) | timestamp_custom('%-I:%M %p') }}"
          title: "Calendar Reminder"
Example 2: Automatic Movie Night Lighting
Imagine you have an event on your calendar called “Movie Night.” This automation will turn on the living room mood lighting when the event starts and turn it off when it ends.
automation:
  - alias: "Event-Based Lighting Schedule"
    trigger:
      - platform: calendar
        event: start
        entity_id: calendar.device_automation
      - platform: calendar
        event: end
        entity_id: calendar.device_automation
    condition:
      - condition: template
        value_template: "{{ 'Movie Night' in trigger.calendar_event.summary }}"
    action:
      - service: "light.turn_{{ 'on' if trigger.event == 'start' else 'off' }}"
        target:
          entity_id: light.living_room_lights
Advanced Example 1: Proactive Telegram Meeting Alerts
This one is a real daily driver. It sends a Telegram alert 10 minutes before any event containing the word “Meeting” begins.
automation:
  - alias: "Telegram Meeting Alerts"
    trigger:
      - platform: calendar
        event: start
        entity_id: calendar.work
        offset: "-00:10:00"
    condition:
      - condition: template
        value_template: "{{ 'Meeting' in trigger.calendar_event.summary }}"
    action:
      - service: notify.telegram_personal_bot # Replace with your notification service
        data:
          message: "Reminder: The '{{ trigger.calendar_event.summary }}' meeting starts in 10 minutes at {{ trigger.calendar_event.location | default('an unspecified location') }}."
Advanced Example 2: Smart Pre-Heating/Cooling
If you have a recurring event marking the end of your workday, you can use it to have your home waiting at the perfect temperature. This automation turns on the heat 30 minutes before your workday ends, but only if it’s cold outside (below 15°C / 59°F).
automation:
  - alias: "Activate Climate Control Before Arriving Home"
    trigger:
      - platform: calendar
        event: end
        entity_id: calendar.work
        offset: "-00:30:00"
    condition:
      - condition: numeric_state
        entity_id: sensor.outside_temperature
        below: 15
    action:
      - service: climate.set_temperature
        target:
          entity_id: climate.living_room_thermostat # e.g., an Airzone thermostat or an Aqara E1
        data:
          temperature: 21
          hvac_mode: heat
Calendar Trigger Variables Explained
When a calendar trigger fires, it makes a bunch of useful data (variables) about the event available for you to use in your conditions and actions. These are the most important calendar trigger variables you need to know:
| Template Variable | Data / Value |
|---|---|
trigger.platform | Fixed value: calendar |
trigger.event | The event type that fired the automation: start or end. |
trigger.calendar_event | The complete calendar event object. |
trigger.calendar_event.summary | The title or summary of the event. |
trigger.calendar_event.start | Event start date and time, e.g., 2026-04-10 11:30:00-07:00. |
trigger.calendar_event.end | Event end date and time, e.g., 2026-04-10 11:45:00-07:00. |
trigger.calendar_event.all_day | Boolean value (true/false) indicating if it’s an all-day event. |
trigger.calendar_event.description | The detailed description of the event, if available. |
trigger.calendar_event.location | The location of the event, if available. |
trigger.offset | The TimeDelta object configured in the trigger. |
Advanced Considerations for 2026
Handling Time Zones and Recurring Events
A common question is how Home Assistant handles time zones and repeating events. The good news is that it manages both transparently:
- Time Zones: Home Assistant correctly respects the time zone information embedded in events from external calendars like Google Calendar. For the local calendar, it will use the time zone configured in your Home Assistant instance. It’s crucial to ensure your system’s general settings (under Settings > System > General) are correct.
- Recurring Events: They just work! The calendar trigger treats each occurrence of a recurring event as a unique, individual event. If you have a meeting every Monday at 9:00 AM, the automation will fire every single Monday at that time. No extra setup needed.
With this guide, you have everything you need to start unlocking the full potential of Home Assistant calendar automations. I encourage you to experiment with your own calendars and discover new ways to make your home smarter and more in tune with your life.