As an Amazon Associate, I earn from qualifying purchases. En calidad de Afiliado de Amazon, obtengo ingresos por las compras adscritas que cumplen los requisitos aplicables. If you buy through these links, the price is the same for you and Amazon pays me a small commission that helps keep Tecnoyfoto running.
Updated on March 24, 2026
The Definitive 2026 Guide: Installing Home Assistant on Raspberry Pi & More
If you’re reading this, you’re on the hunt for the best platform for your smart home automation needs in 2026. The answer is, more emphatically than ever, Home Assistant. Its unwavering commitment to local control, user privacy, and an unstoppable community makes it the definitive brain for any smart home. This guide has been completely overhauled to give you the clearest, most up-to-date path to starting your journey.
Home Assistant Installation Methods in 2026
Home Assistant offers a few installation paths, but for the vast majority of users, the choice has become incredibly simple. Here are the main options:
- Home Assistant Operating System (HAOS): This is the method I wholeheartedly recommend for anyone getting started. It’s a minimal, optimized OS designed exclusively to run Home Assistant. It includes the Supervisor, which gives you access to a massive library of Add-ons (in-app programs), and handles updates and backups with ease.
- Home Assistant Container: If you’re a Docker veteran and want to run Home Assistant alongside other services on a single server, this is your route. You’ll install only the Home Assistant Core in a container. Be aware that this method does not include the Supervisor or the Add-on Store.
Other methods, like manually installing the Supervisor or running HA Core in a Python virtual environment, are considered developer-only or for highly specific niche cases in 2026 and are not recommended for beginners.
What Hardware Do I Need to Get Started with Home Assistant?
Home Assistant’s flexibility extends to hardware. You can run it on a wide array of devices, from low-power single-board computers to beefy home servers.
- Official Plug-and-Play Devices: For the most straightforward experience, Nabu Casa (the company behind Home Assistant) offers the Home Assistant Green. It’s an affordable, turnkey device that you just plug in. It’s ideal if you want to skip any initial setup headaches.
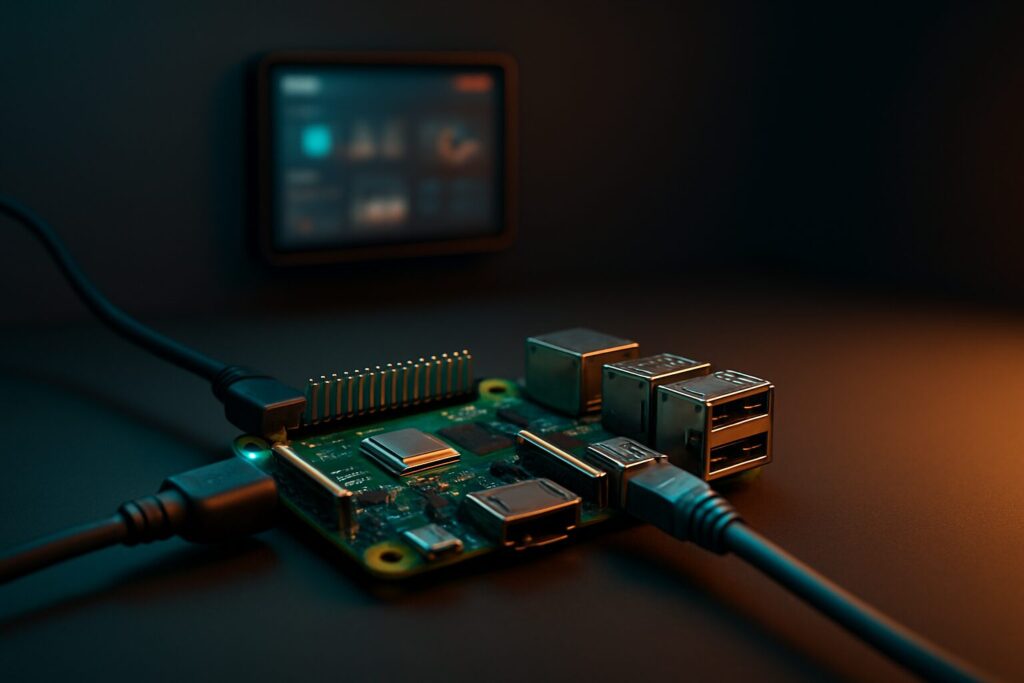
- Raspberry Pi: The classic choice and the star of this guide. As of today, the Raspberry Pi 5 is the recommended board for its power and versatility, delivering a snappy experience even with complex setups.
- Mini PCs and Servers: If you’re chasing maximum performance, a Mini PC (like an Intel NUC or a Beelink model) is an excellent and very popular option. You can also install Home Assistant in a virtual machine on a NAS that supports virtualization or Docker.
Home Assistant on Raspberry Pi: 2026 Showdown
While a home assistant raspberry pi 4 is still a capable device—especially if you can find one secondhand—the Raspberry Pi 5 represents a quantum leap in performance. Here’s a table to help you decide:
| Model | Pros | Cons | Estimated Price |
|---|---|---|---|
| Raspberry Pi 5 (4GB/8GB) | Blazing-fast performance, native NVMe SSD support, the most future-proof option. | Requires a specific 5A (27W) power supply and active cooling. Higher initial cost. | ~$75 – $110 (board only) |
| Raspberry Pi 4 (4GB/8GB) | Still very capable for most setups. Great budget pick if you already own one or find a deal. | Performance can bog down with many add-ons or cameras. SD card storage is slow and unreliable long-term. | Varies (check used market) |
| Home Assistant Green | Out-of-the-box ready, includes reliable eMMC storage, compact and optimized design. | Less powerful than a RPi 5; not for users who want to tinker with the underlying hardware. | $99 |
Checklist: What You Need to Install Home Assistant on a Raspberry Pi 5
To follow this tutorial, you’ll need to gather these components:
- A Raspberry Pi 5 (I recommend the 4GB model as a minimum).
- An official 27W (5V/5A) USB-C power supply. This is non-negotiable for stable performance.
- A high-endurance microSD card (A2-rated, 64GB minimum) or, for vastly superior performance and reliability, an NVMe SSD with a compatible “HAT” adapter.
- A case with active cooling (a fan). The RPi 5 runs hotter, and proper cooling is essential to prevent thermal throttling.
- An Ethernet cableAffiliate link to connect it directly to your router.
Step-by-Step: Installing the Home Assistant Operating System
The process of installing the Home Assistant operating system has been streamlined thanks to tools like the Raspberry Pi Imager.
1. Prep Your Software
Download and install the Raspberry Pi Imager application on your computer from the official website. It’s free and available for Windows, macOS, and Linux. While tools like Balena Etcher still work, Pi Imager is now the most direct method.
2. Flash the HAOS Image
- Insert your microSD card (or NVMe SSD in a USB adapter) into your computer.
- Open the Raspberry Pi Imager.
- Click “CHOOSE DEVICE” and select your Raspberry Pi model (e.g., Raspberry Pi 5).
- Click “CHOOSE OS”. Navigate to “Other specific-purpose OS” -> “Home assistants and home automation” -> “Home Assistant”. Select the image appropriate for your board (e.g., “Home Assistant OS RPi 5”).
- Click “CHOOSE STORAGE” and select the drive for your microSD or SSD. Warning: This will completely erase the selected drive. Double-check you’ve chosen the correct one!
- Click “WRITE” and wait for the process to complete. This can take several minutes.
3. The First Boot
- Safely eject the microSD card or SSD from your computer and insert it into your Raspberry Pi.
- Connect the Ethernet cable from the Raspberry Pi to your router.
- Connect the power supply. The Raspberry Pi will power on and begin its initial setup process.
- Be patient. This first boot can take up to 20 minutes as Home Assistant downloads the latest updates and configures itself. This is a perfect time to grab a coffee.
- From another device on the same network, open a web browser and go to
http://homeassistant.local:8123. If that doesn’t work, you’ll need to find your Pi’s IP address in your router’s admin panel and navigate tohttp://YOUR_IP_ADDRESS:8123.
Initial Setup: Your First Steps in Home Assistant
Once you see the welcome screen, you’re ready to configure Home Assistant. Follow these steps to get it dialed in:
- Create Your Admin Account: Choose a username and a strong password. This will be your primary login.
- Set Your Location: Give your home a name and set your location and elevation on the map. This is vital for sun-based automations (like turning on lights at sunset) and weather forecasts.
- Device Discovery: Home Assistant will scan your network and show you any compatible devices it found. You might be surprised how much it detects! You can set them up now or do it later.
- Enable Advanced Mode: Go to your user profile (click your name in the bottom-left corner) and toggle on “Advanced Mode”. This is a must-do step. It unlocks access to the full suite of developer and configuration tools you’ll need.
- Set a Static IP Address: To prevent future connection headaches, it’s critical for your Home Assistant to have a permanent IP address. Navigate to Settings > System > Network, select your network adapter (usually `eth0`), and under the IPv4 section, change it from “Automatic (DHCP)” to “Static”. Enter the IP you want (outside your router’s DHCP range), the subnet mask (usually 255.255.255.0), the gateway (your router’s IP), and DNS servers (you can use your router’s IP or a public one like 8.8.8.8).
What’s Next? Your Smart Home Adventure Begins
Congratulations, you have a fully functional Home Assistant instance! Now the real fun begins. Here are a few ideas to get you started:
- Explore the Add-on Store: Navigate to Settings > Add-ons. Here you can install powerful programs that expand your system’s capabilities. I recommend starting with Samba share to easily access your config files from your PC and Google Drive Backup to keep your setup safe in the cloud.
- Add Your First Zigbee Devices: Zigbee is the go-to wireless protocol for smart home devices. You’ll need a coordinator to get started. I’ve done a deep dive on the SMLIGHT SLZB-06, one of the best Zigbee Ethernet coordinators of 2026. Once you have a coordinator, you can install and configure Zigbee2MQTT to add sensors, lights, and switches from hundreds of brands.
- Build Your First Dashboards and Automations: Start organizing your devices into cards on your main dashboard. Then, dive into the automation editor to create your first rules, like “When the front door opens, turn on the entryway light.”
This is just the beginning. Home Assistant is a universe of possibilities that will grow with you and your home. Welcome aboard!
Follow Me on YouTube