
This article may contain affiliate links. If you buy through these links, the price is the same for you and the store pays me a small commission that helps keep Tecnoyfoto running.
If you have been in the home automation world for a while, you know that keeping your code clean is not easy. As your setup grows, organizing Home Assistant with packages becomes an absolute necessity to avoid chaos. Today we will see how artificial intelligence can do this heavy lifting for you in a matter of minutes.
Why do you need to organize Home Assistant with packages?
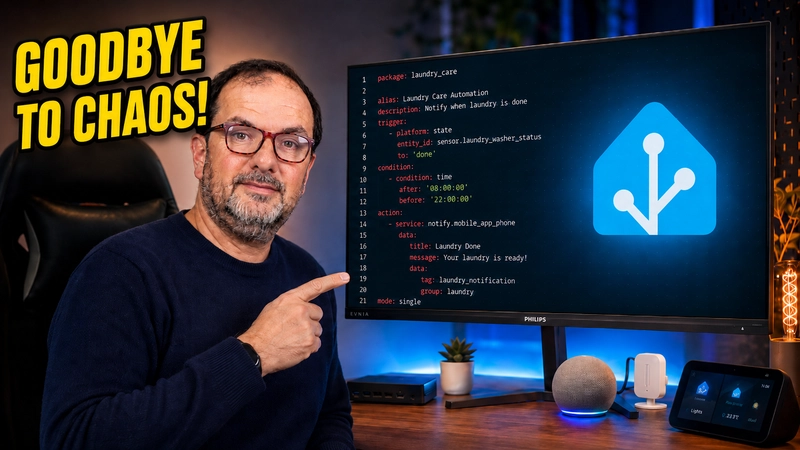
When we start automating devices, like a dishwasher or a washing machine, we create multiple elements. You need an input_select, you create consumption sensors, configure automations, and write scripts.
The problem is that, by default, each of these elements goes to its corresponding file. You have automations in one place, scripts in another, and sensors lost in your configuration.yaml.
Ultimately, your server becomes a mess. The day you want to modify a simple parameter, you spend a good while looking for where all the scattered code is located.
The solution is to unify everything in a single file. In this package, you will have everything related to that specific appliance or room: automations, sensors, scripts, and helpers.
The Advantage of Packages in Your Smart Home
It is important to be honest: grouping your code this way will not make Home Assistant run faster. The system will continue to operate exactly the same, processing data at the exact same speed.
The real advantage is entirely for you. If you unify all the devices in a room, or all your lights in a single file, you achieve absolute control.
It becomes much easier to edit, maintain, or make any future changes without going crazy navigating between tabs. This is real, practical, and useful home automation for everyday life, without unnecessary pretense.
If you want to dive into the official documentation, you can review the Home Assistant Packages guide.
How to Create Packages Automatically with Artificial Intelligence
Do not worry, I am not going to make you search and copy code by hand from all your files. We can delegate this task to the most powerful artificial intelligence models of the moment using development tools.
For this process, I recommend two main workflows:
- Antigravity: Using top models like Claude Opus 4.6 or Gemini 3.1 Pro High. Antigravity generates a detailed visual report, automation schemes, and a summary of modified files.
- Visual Studio Code: Working directly in the guts of Home Assistant with OpenAI’s Codex (version 5.4 in extra high mode). It is highly capable, although it consumes more tokens during the process.
The process is very straightforward. You simply open your code assistant and give it a clear prompt indicating to gather the automations and entities of your device (for example, the washing machine) into a package, and to review the logic to avoid errors.
In about 20 minutes, the AI delivers a unified .yaml file with the introduction, helpers, sensors, and automations perfectly structured.
Validations and Backups (Essential)
Before starting to modify anything with AI, make sure you have a backup. You never know what can fail, and you must always prevent data loss in a production environment.
Once the AI has finished packaging your files, do not blindly restart. You must always validate the configuration first.
Navigate to the developer tools in Home Assistant, go to “Server controls,” and click on “Check configuration.” If the system indicates that everything is correct, you can safely apply the changes.