
As an Amazon Associate, I earn from qualifying purchases. En calidad de Afiliado de Amazon, obtengo ingresos por las compras adscritas que cumplen los requisitos aplicables. If you buy through these links, the price is the same for you and Amazon pays me a small commission that helps keep Tecnoyfoto running.

This was my first rain sensor for Home Assistant. I built it using an Aqara water leak sensor and a simple resistive rain plate installed outdoors.
The idea was very simple: reuse a battery-powered Zigbee sensor to detect when rainwater electrically bridged the contacts on an outdoor plate.
It worked and, for quite some time, it did exactly what I needed. But after several years and after testing other solutions, I can also explain its limitations and what I would do differently today.
2026 update: this setup is still valid if you already have an Aqara water leak sensor and you only want to detect rain / no rain. It is not a rain gauge and it does not measure accumulated rainfall or real rain intensity.
The idea behind the project
Aqara water leak sensors are designed to detect water in places such as kitchens, bathrooms or areas where a leak may occur.
On the bottom they have two metal contacts. When water electrically connects both contacts, the sensor detects moisture and sends the state change over Zigbee.
My idea was very simple:
extend those two contacts to a rain detection plate installed outdoors.
This way, the Aqara sensor could remain protected inside a box while only the plate itself was exposed to rain.
When enough water covered the tracks on the plate, the electrical circuit closed and the Aqara interpreted it exactly as if it had detected a water leak.
Home Assistant then received a binary state:
- Dry: no water detected.
- Wet: water detected, which we can treat as rain.
There is no analog measurement in this setup and no reliable rain intensity estimation.
What you need
Materials
- Aqara water leak sensorAffiliate link
- Rain sensor plateAffiliate link
- Dupont wiresAffiliate link
- IP44 protective boxAffiliate link
- Xiaomi/Aqara GatewayAffiliate link, only if you use this system to integrate the sensor
The Aqara gateway is not mandatory. If you use Home Assistant with your own Zigbee coordinator and your exact Aqara sensor model is supported by ZHA or Zigbee2MQTT, you can integrate it directly.
Tools
- Wire cuttersAffiliate link
- Wire strippersAffiliate link
- ScrewdriversAffiliate link
- Hot glue gunAffiliate link
- 2.5 x 18 mm screwsAffiliate link
How this rain sensor actually works
It is important to understand that, in this setup, the outdoor plate is not really measuring anything.
We are not using its resistance to calculate rain intensity, and there is no electronic module interpreting an analog signal.
The plate simply acts as an extension of the Aqara’s two detection contacts.
When dry, the tracks are not electrically connected.
When enough water covers the surface, the water allows current to pass between the tracks and the Aqara changes to a wet state.
So the logic is:
DRY PLATE
↓
Open contacts
↓
Aqara dry
↓
Home Assistant: no rain


WET PLATE
↓
Water connects the tracks
↓
Aqara detects moisture
↓
Home Assistant: rain
It is an extremely simple system.
Building the sensor
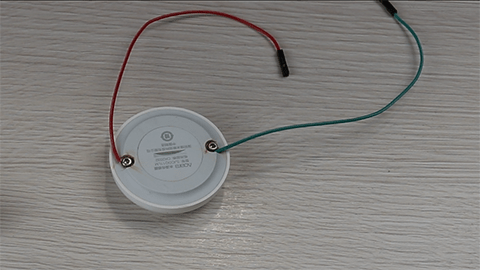
1. Connect the wires to the Aqara sensor
The first step is to extend the two contacts used by the Aqara to detect water.
2. Route the wires outside the box
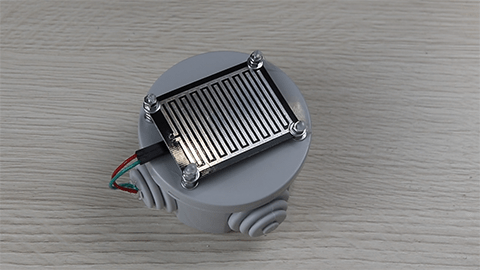
Make two small openings for the wires that will connect the Aqara to the outdoor plate.

It is a good idea to properly protect and seal any cable entry points. The box should protect the Aqara sensor and, especially, its battery and connections from rain and humidity.
3. Install the rain plate
The plate must remain outdoors because it is the surface we actually want to get wet.

It is a good idea to install it with a slight angle so that water can drain away instead of remaining permanently on the surface.
4. Integrate the Aqara sensor
Pair the sensor with your Zigbee system.
You can use an Aqara gateway or connect it directly to Home Assistant using ZHA or Zigbee2MQTT if your exact model is supported.

5. Connect the outdoor rain plate
Finally, connect the two wires coming from the Aqara sensor to the resistive plate.

The sensor is now ready.
Integration with Home Assistant
Once the Aqara sensor is integrated, Home Assistant will provide a binary entity indicating whether the sensor is dry or has detected water.
The exact entity name will depend on the integration and the device you are using.
I recommend giving it a clear name, for example:
binary_sensor.aqara_rain_sensorThis makes it much easier to use later in automations, dashboards or derived sensors.
Automation example
One of the simplest automations is to receive a notification when it starts raining.
alias: Alert when it starts raining
triggers:
  - trigger: state
    entity_id: binary_sensor.aqara_rain_sensor
    from: "off"
    to: "on"

actions:
  - action: notify.mobile_app_your_phone
    data:
      title: "Rain"
      message: "It has started raining."

mode: single
You must replace both the sensor entity ID and the notification service with the ones used in your own installation.
The same state change can also be used to:
- notify you when it starts raining;
- close motorized windows;
- retract an awning;
- pause irrigation;
- warn you if clothes are drying outside;
- record the last day it rained;
- trigger any other outdoor-related automation.
The main problem: corrosion
This is the part that, over the years, became the main limitation of this setup for me.
The plate is made of metal tracks that necessarily remain exposed.
And we are using that plate to do something that is not particularly friendly to exposed metal tracks:
getting them wet again and again.
With rain, ambient humidity, dirt and repeated wet and dry cycles, the tracks can deteriorate and oxidize.
The Aqara sensor itself may continue working perfectly while the outdoor plate gradually degrades.
Important: the Aqara Water Leak Sensor is designed as a leak detector, not as an outdoor weather sensor. The Aqara sensor, its battery and its connections must remain protected. Only the plate used as the detection surface should be exposed.
An IP44 box does not make the installation waterproof
In the original setup I used an IP44 box.
It can provide useful protection against certain splashes when properly installed, but IP44 should not be interpreted as a completely waterproof enclosure suitable for every outdoor condition.
Pay particular attention to:
- cable entry points;
- box orientation;
- direct water exposure;
- condensation;
- the condition of seals;
- protection of the battery and the Aqara sensor itself.
Does it still make sense in 2026?
Yes, but it depends on your situation.
If you already have an unused Aqara water leak sensor and a rain detection plate, this setup is still a simple way to create a wireless rain detector for Home Assistant.
It has several useful advantages:
- it runs on battery;
- it uses Zigbee;
- you do not need to run power to the detection point;
- Home Assistant only needs to receive a binary state;
- the setup is very simple.
But it also has an obvious limitation:
the outdoor resistive plate effectively becomes a consumable over the long term.
It can work for quite a long time, but it is continuously exposed to the very element we want to detect.
What I learned afterwards
This was my first attempt at detecting rain in Home Assistant.
Later, I built a second version by connecting a rain plate directly to ESPHome:
That version gave me much more control from ESPHome and even allowed me to work with an analog reading.
However, one problem remained exactly the same:
the metal surface responsible for detecting rain was still exposed to water.
Eventually I moved to a third, completely different solution: an Aqualin Mini-Click mechanical rain sensor connected to an ESP32 with ESPHome.
Instead of measuring conductivity through exposed tracks, the Aqualin uses a physical mechanism and simply provides a dry contact.
I have lost any attempt to estimate rain intensity, but for my current use I prefer to have much simpler information:
rain or no rain.
Comparison of the three solutions I have used
| Solution | Connection | Main advantage | Main limitation |
|---|---|---|---|
| Aqara + resistive plate | Zigbee / battery | No outdoor power supply required | The plate deteriorates over time |
| Resistive plate + ESPHome | ESP32 / Wi-Fi | More control and analog reading | The metal plate is still exposed |
| Aqualin Mini-Click + ESPHome | Dry contact / ESP32 | Very simple mechanical system | Only reports rain / dry |
Is this a rain gauge?
No.
And it is important to make that clear.
This setup only detects when there is enough water on the plate to trigger the Aqara sensor.
It cannot tell us:
- how many millimeters of rain have fallen;
- how many liters per square meter have fallen;
- the real intensity of the rainfall;
- how much rain has fallen during the day.
For those measurements we need a real rain gauge.
This project solves a different need:
knowing whether it is raining so Home Assistant can react.
Video of the original build
This is the video I recorded when I first built this sensor.
Conclusion after several years
I do not consider this first setup to have been badly designed.
In fact, at the time it solved something I wanted to achieve in a very simple way: allowing Home Assistant to know when it was raining using a battery-powered Zigbee sensor.
The Aqara sensor was not the problem.
The part that aged the worst was the outdoor resistive plate.
If you already have the required hardware, it is still a useful and inexpensive way to build a binary rain detector.
But if I were starting from scratch today and looking for a permanent outdoor installation, I would prefer to avoid a metal surface that depends on being continuously exposed to water.
And that is exactly how my own installation has evolved:
first Aqara, then ESPHome with a resistive plate, and finally a mechanical dry-contact sensor.
Not because the previous solutions did not work, but because using them for years helped me understand what I actually need.
And for my current automations, what I need is actually very simple:
Home Assistant reliably knowing whether it is raining.
Continue reading
Next related guide · 12 min read
Aqualin Mini-Click Rain Sensor with ESPHome and Home Assistant
I integrated an Aqualin Mini-Click rain sensor into Home Assistant using an ESP32 and ESPHome to replace my old resistive sensor setup. I wanted…
Continue with this article