As an Amazon Associate, I earn from qualifying purchases. En calidad de Afiliado de Amazon, obtengo ingresos por las compras adscritas que cumplen los requisitos aplicables. If you buy through these links, the price is the same for you and Amazon pays me a small commission that helps keep Tecnoyfoto running.
Last Updated: March 18, 2026
Welcome to the definitive guide for your new Xbox Series XAffiliate link|S setup in 2026. We’re cutting through the noise to give you a clear, step-by-step walkthrough. We’ll cover everything from the initial unboxing and physical connections to advanced audio/video calibration, parental controls, and common troubleshooting fixes, so you can get from the box to the boss fight in record time.
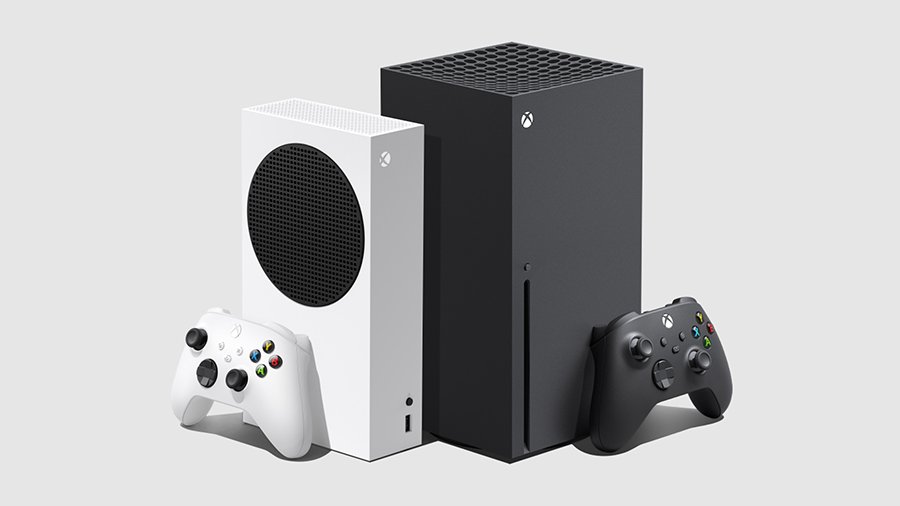
A next-gen console like the compact Xbox Series SAffiliate link or the powerhouse Xbox Series XAffiliate link is an awesome centerpiece for any gamer’s setup. But to get that flawless experience from the moment you plug it in, a proper initial setup is crucial. It might look a little intimidating, but trust me—follow these steps, and you’ll be up and running in no time.
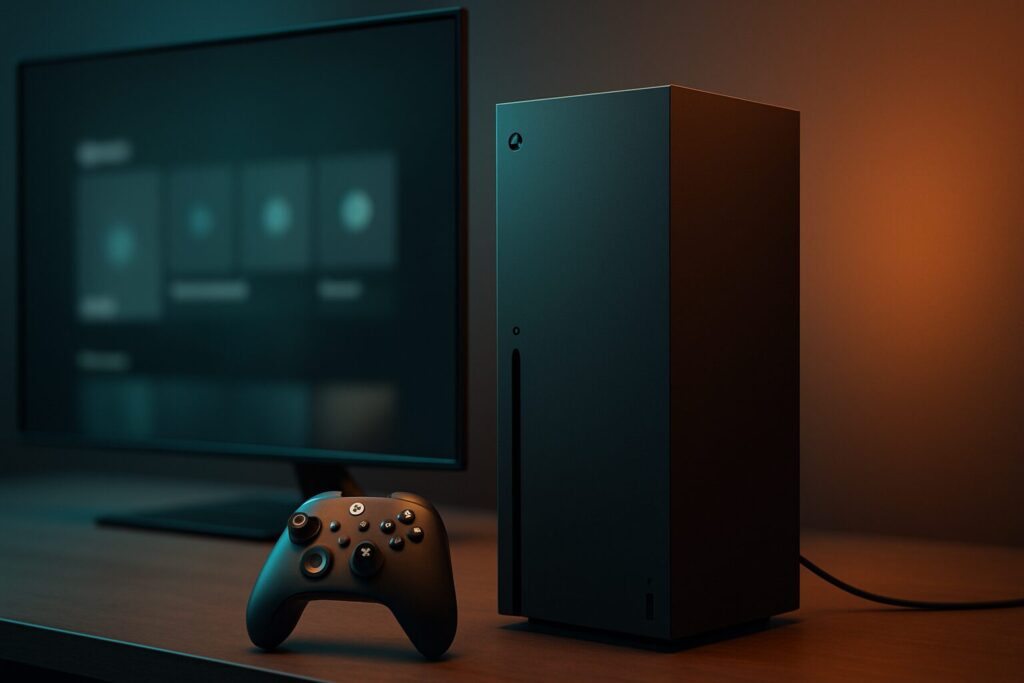
1. Unboxing and Physical Connections
First things first, let’s get it out of the box. Open it up and do a quick inventory check. Whether you have a Series X or a Series S, you should find the following inside:
- The Xbox Series XAffiliate link or Series S console.
- One Xbox Wireless Controller (Carbon Black for the Series X, Robot White for the Series S).
- One Ultra High Speed HDMI 2.1 cable (this is key for 4K @ 120Hz).
- The power cord.
- Documentation (quick start guide and warranty).
The process to connect the Xbox to your TV is dead simple. Plug one end of the power cord into the console and the other into an outlet. Then, use the included HDMI cable to connect the port labeled “HDMI OUT” on the Xbox to an HDMI port on your TV or monitor. Pro-tip: If you have a soundbar or an A/V receiver, my expert recommendation is to plug the Xbox directly into the TV, then use the TV’s eARC/ARC port to send the audio to your sound system. This guarantees the lowest possible video latency for a more responsive gaming experience.
2. Powering Up and Pairing Your Controller
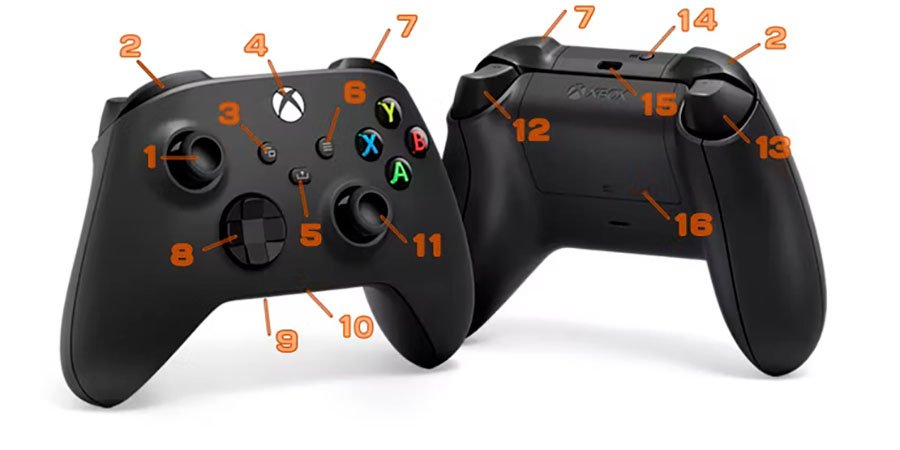
The Xbox controller is arguably one of the most ergonomic designs out there. Before you start, pop in the two included AA batteries. To turn on the console for the first time, just press the Xbox logo button on the front of the console. The logo will light up.
Now, let’s pair your Xbox Series controller. Follow these steps:
- Turn on the controller by pressing and holding the central Xbox button until it flashes.
- Find the pair button on the console. It’s a small, circular button located right next to the front USB port.
- Press and release the pair button on the console. The Xbox logo on the console will start flashing.
- Within 20 seconds, press and hold the pair button on the controller (it’s on the top, near the USB-C port) for a few seconds.
- The Xbox logo on the controller will flash more rapidly and then turn solid, confirming a successful sync.
3. Initial Xbox Setup: The On-Screen Wizard
Once you power on the console, a setup wizard will appear. Here’s my best advice: download the “Xbox” app on your smartphone (iOS or Android) right now. Using the app lets you type things like Wi-Fi passwords and account details with your phone’s keyboard, which is way more convenient than using the controller.
3.1. Internet Connection and System Update
The first thing the console will ask is to connect to the internet. You have two choices:
- Wi-Fi: Convenient and cable-free, but prone to interference and slower speeds.
- Ethernet (Wired): This is the option I always recommend. It delivers a more stable connection, faster speeds, and lower latency—all of which are critical for online gaming and downloading today’s massive game files.
Once connected, the console will automatically check for and install the latest system update. This is a mandatory step that includes performance boosts, security patches, and the newest Xbox dashboard features. Be patient; it can take a few minutes.
3.2. Creating Profiles and Your Microsoft Account
To use your Xbox, you need a Microsoft Xbox account. If you already have one (from a Windows PC, Outlook, Skype, or a previous Xbox), just sign in. All your achievements, friends, and digital purchases will sync automatically.
If you don’t have an account, the creation process is free and fast. You’ll need to choose a Gamertag (your online nickname). Once you’re in, the console will likely offer you a subscription to Xbox Game Pass Ultimate. If you’re new, there are often incredible introductory deals. Game Pass is Xbox’s killer app, giving you access to a library of hundreds of games for one monthly fee.
4. Dialing In Your A/V Settings for an Immersive Experience
As a tech blogger who obsesses over this stuff, this is the most important part to get right if you want to unlock your console’s full potential. Navigate to Settings > General > TV & display options.
4.1. Video Settings: 4K, HDR, and 120Hz
- Resolution: The console should auto-detect your TV’s max resolution. For the Series X, make sure it’s set to 4K UHD. For the Series S, 1080p or 1440p is the sweet spot.
- Refresh rate: If your TV supports 120Hz, select it here. This provides unbelievably smooth motion in compatible games.
- HDR and Dolby Vision: Under the “Video modes” section, check the boxes for “Allow 4K,” “Allow HDR10,” and, if your TV supports it, “Dolby Vision for Gaming.” High Dynamic Range (HDR) delivers far more vibrant colors and deeper contrast.
- VRR and ALLM: Make sure to enable “Allow variable refresh rate (VRR)” to eliminate screen tearing and “Auto Low-Latency Mode (ALLM)” to let your TV automatically switch to its game mode.
To see what your TV is capable of, go to “4K TV details.” The Xbox will give you a comprehensive checklist of all the features your display supports.
4.2. Audio Settings: Unleashing Spatial Sound
Head over to Settings > Volume & audio output to configure your sound setup.
- Headset audio: The default is “Windows Sonic for Headphones,” which is an excellent free spatial audio system. If you own a license, you can select “Dolby Atmos for Headphones” or “DTS Headphone:X” for even greater immersion.
- Speaker audio: If you have a home theater system or a soundbar, select the appropriate option (5.1/7.1 uncompressed or Bitstream out with Dolby Atmos for home theater or DTS:X format).
5. Transfer Your Games & Data From an Old Console
Coming from an Xbox One? You don’t have to re-download your entire library. Go to Settings > System > Backup & transfer > Network transfer. If both consoles are on the same home network, you can copy games and apps directly from one to the other, which is much faster than downloading from the internet.
Another great option is using a USB 3.0 external hard drive. You can move your Xbox One games to the external drive, then plug it into your new Series X|S and play them directly (the only exception is games Optimized for Series X|S, which must be on the internal storage or an official Storage Expansion Card to run).
6. Setting Up Family and Parental Controls
Xbox offers a robust and easy-to-manage parental control system. The best way to handle this is through the Xbox Family Settings app on your smartphone. From the app, you can:
- Set screen time limits for each day of the week.
- Filter content by ESRB rating (E for Everyone, T for Teen, M for Mature, etc.).
- Approve or deny purchase requests.
- Manage friend lists and online communication.
For more comprehensive network-level protection, you can also explore the parental control and security settings on your router.
7. Common Xbox Series X|S Setup Troubleshooting
Did something go wrong? Here are a few quick fixes for the most common issues during your initial Xbox Series setup.
- The controller won’t connect: First, make sure the batteries are fresh. Bring the controller closer to the console and repeat the pairing process. If it still fails, connect the controller to the console with a USB-C cable to force the connection and check for a firmware update.
- No video signal on the TV: Double-check that you’re using the included HDMI 2.1 cable and that it’s securely plugged into both the console and the TV. Make sure you’ve selected the correct HDMI input on your TV. If the problem persists, try resetting the console’s display settings (On Series X, with the console off, press and hold the power button and the eject button. On the all-digital Series S, press and hold the power button and the pair button).
- The internet connection is failing: If you’re on Wi-Fi, try moving the console closer to your router or rebooting the router itself. As I mentioned before, a wired Ethernet connection is the best way to avoid these problems. You can also try to change your DNS settings in the advanced network menu for better stability.
And that’s it! Your Xbox Series XAffiliate link|S is now fully configured and optimized to deliver the best gaming experience possible in 2026. All that’s left to do is download your favorite titles from the Store or Game Pass and dive in. Happy gaming!
Follow Me on YouTube