

Updated August 1, 2026. The ADC wiring, ESPHome code, calibration guidance, and safety limitations have been fully reviewed.
An ESPHome MQ-2 sensor can show how a resistive sensor changes when exposed to smoke or certain flammable vapors. An ESP32 and Home Assistant make that signal easy to record and compare, but they do not automatically produce trustworthy ppm values or a certified gas alarm.
Important safety warning: this is an educational project. It does not replace a certified smoke, carbon monoxide, natural gas, propane, or LPG detector. Never rely on it to protect people, declare a room safe, or control a hazardous situation automatically.
The distinction matters because an MQ-2 responds to several substances and changes with temperature, humidity, age, supply voltage, and module tolerances. This guide publishes an honest, filtered ADC voltage. If you are new to the platform, our Home Assistant guide explains how the pieces fit together.
What the MQ-2 actually measures
The MQ-2B sensing material is tin dioxide, SnO₂. It has lower conductivity in clean air. When certain combustible gases or smoke are present, conductivity increases, and the module circuit turns that resistance change into an analog voltage.
Winsen describes the MQ-2B as particularly sensitive to propane and smoke, while also responding to natural gas, methane, alcohol, and other flammable vapors. This cross-sensitivity means a high reading cannot identify the substance. Perfume, cleaning products, cooking fumes, and environmental changes can all affect the signal.
| MQ-2B specification | Reference value |
|---|---|
| Heater voltage | 5.0 V ±0.1 V |
| Heater consumption | Up to 950 mW |
| Manufacturer detection range | 300–10,000 ppm flammable gas under test conditions |
| Initial preheat | At least 48 hours |
| Output during the 2,000 ppm propane test | 2.5–4.0 V |
Those figures describe the sensor in the manufacturer’s circuit and controlled environment. They do not turn the analog output of every breakout board into a universal measurement, and the listed ppm range does not justify applying a linear voltage formula.
Parts required
- An MQ-2 module with an
AOanalog output. - An ESP32 supported by ESPHome.
- A stable 5 V supply with enough current for the heater.
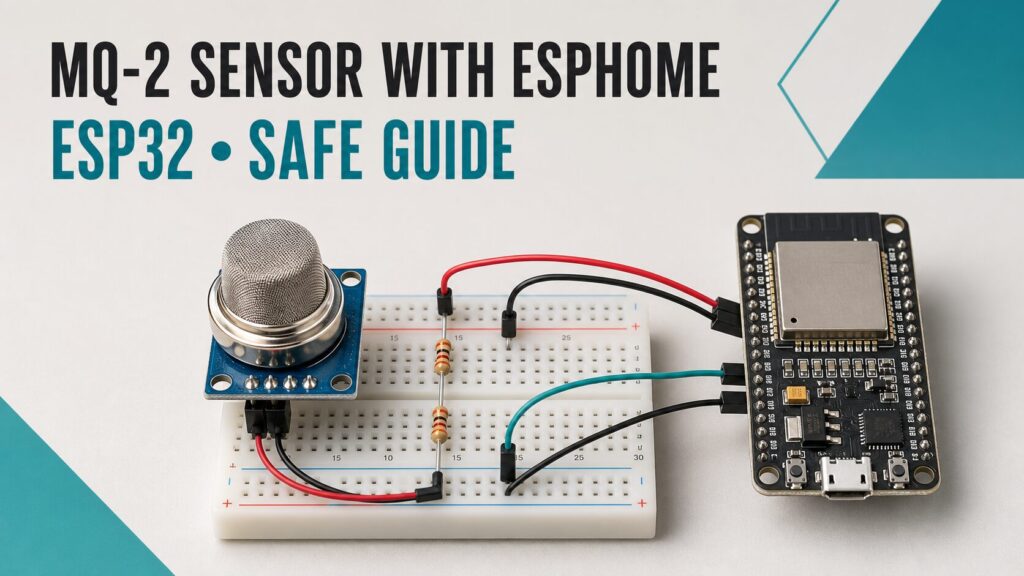
- One 10 kΩ and one 15 kΩ resistor for the voltage divider.
- A breadboard, jumper wires, and a multimeter.
- ESPHome Device Builder and Home Assistant.
The heater alone can draw roughly 190 mA at 5 V before the module LEDs and electronics are counted. Do not power the MQ-2 from the ESP32’s 3.3 V pin.
Why the ESP32 needs a voltage divider
The module normally runs at 5 V, and its analog output can exceed the ESP32 ADC’s practical range. ESPHome documents a usable maximum of approximately 3.12 V with attenuation: auto, with some variation between chips. A 4 or 5 V output must not be connected directly.
Vadc = Vmq2 × R2 / (R1 + R2)

R1 = 10 kΩ between AO and GPIO34
R2 = 15 kΩ between GPIO34 and GND

If Vmq2 = 5.0 V, Vadc = 3.0 V
The divider protects the ADC and changes the signal scale, which must be considered during comparisons. Measure the GPIO34 node with a multimeter before connecting the ESP32. Recalculate the maximum and leave margin if you choose different resistor values.
Safe MQ-2 to ESP32 wiring
| MQ-2 pin | Connection |
|---|---|
| VCC | Stable 5 V supply |
| GND | Common ground with the ESP32 |
| AO | 10 kΩ R1; divider midpoint to GPIO34 |
| GPIO34 node | 15 kΩ R2 to GND |
| DO | Not connected in this guide |
The DO output comes from a comparator and the module potentiometer. It only reports that the signal crossed a local setting; it cannot identify a gas, report ppm, or make the module a safety alarm. We therefore leave it unused.
Current ESPHome configuration
This example uses GPIO34, an ADC1 pin on the original ESP32 that remains available while Wi-Fi is active. It publishes only the voltage reaching the ADC after the divider. Store your real credentials in secrets.yaml rather than embedding them in a configuration you may share.
substitutions:
  device_name: "living-room-mq2"
  friendly_name: "Living room MQ-2"

esphome:
  name: ${device_name}
  friendly_name: ${friendly_name}

esp32:
  board: esp32dev

logger:

api:
  encryption:
    key: !secret mq2_api_key

ota:
  - platform: esphome
    password: !secret mq2_ota_password

wifi:
  ssid: !secret wifi_ssid
  password: !secret wifi_password

sensor:
  - platform: adc
    pin: GPIO34
    id: mq2_adc_voltage
    name: "MQ-2 ADC voltage"
    unit_of_measurement: "V"
    accuracy_decimals: 3
    attenuation: auto
    update_interval: 2s
    icon: mdi:chart-line
    filters:
      - median:
          window_size: 7
          send_every: 3
          send_first_at: 3
There are no arbitrary multipliers, invented R0 values, or binary “gas detected” entity. This entity represents a relative voltage. Whether it rises or falls depends on the module circuit; observe the actual behavior of your own unit.
Home Assistant history card
A history graph makes warm-up, drift, exposure, and recovery easier to understand than a red or green gauge:
type: history-graph
title: MQ-2 relative signal
hours_to_show: 24
entities:
  - entity: sensor.living_room_mq_2_mq_2_adc_voltage
Select the correct entity in the visual editor if Home Assistant generated a different ID. Temperature and humidity also influence resistive sensors; our BME280 guide provides a practical way to record both.
Warm-up, baseline, and testing
- Leave the sensor powered for at least 48 hours during initial conditioning.
- Place it in a stable, ventilated area away from kitchens, aerosols, steam, and solvents.
- Record several hours to learn the drift of your unit.
- Compare similar days and conditions; note temperature and humidity.
- Do not release gas, operate a lighter, or deliberately create smoke for testing.
Winsen recommends even longer aging after storage: at least 72 hours following one to six months in storage and 168 hours after more than six months. Stabilization is not certified calibration; it only helps create a more repeatable reference.
Why this guide does not display ppm
The manufacturer gives the sensing-resistance equation as Rs = (Vc / VRL - 1) × RL. Turning Rs/R0 into concentration would then require the exact load resistance, a controlled procedure for obtaining R0, the curve for one specific gas, and compensation for temperature, humidity, and tolerances.
A constant such as “9.83” is not the universal R0 of every breakout board. Nor is there one Rs/R0 threshold that means “leak” for every MQ-2. Without a calibration chamber and known reference mixtures, ppm would imply accuracy the assembly does not have.
We follow the same principle in our MQ-3 ESPHome project: these devices are useful for learning about signals and trends, not as legal or life-safety instruments.
Troubleshooting
The reading remains at maximum
Disconnect GPIO34 and measure the divider midpoint. Check R1, R2, the common ground, and attenuation: auto. Never connect AO directly when it can exceed the ADC range.
The ESP32 keeps restarting
The heater draws substantial current. Use a suitable 5 V supply, short wiring, and a sound ground connection. Do not power the assembly from a small 3.3 V regulator.
The signal changes with no obvious smoke or gas
The MQ-2 is cross-sensitive. Alcohol, cleaning products, humidity, temperature, cooking fumes, and heater drift can all change the output. That is another reason not to interpret it as gas identification.
Two modules show different values
That is normal. Sensor elements, load resistors, dividers, supplies, and exposure histories vary. Compare each module with its own baseline.
Original project video
The video shows the original build. Use the wiring, code, and limitations on this page because they were reviewed later.
Frequently asked questions
Can an MQ-2 replace a gas detector?
No. For home safety, use certified detectors for the relevant gas and local regulations, installed according to their manufacturer instructions.
Can it detect carbon monoxide?
It must not be used as a CO alarm. Carbon monoxide requires a detector specifically certified for CO.
Can I use an ESP8266?
Yes, but the ESP8266 chip ADC accepts 0–1 V. Some development boards include an extra divider and others do not. Check the board schematic and recalculate the protection instead of copying the ESP32 divider.
Can I send a notification above a chosen value?
You can create experimental notifications for studying changes, but label them “MQ-2 sensor variation,” not “gas leak detected.” Never make that threshold responsible for a safety function.
Conclusion
An ESPHome MQ-2 sensor is a useful project for learning about ADCs, voltage dividers, filtering, and sensor history. A responsible build protects the ESP32, provides stable power, respects warm-up time, and describes the result as a relative signal.
Combustible gases are serious, so DIY automation should support education rather than replace certified safety equipment.
Technical sources
- Winsen MQ-2B official manual.
- ESPHome ADC sensor and ESP32 attenuation.
- Current ESPHome OTA configuration.
- ESPHome security best practices.
Continue reading
Next related guide · 7 min read
DIY Alcohol Detector with MQ-3, ESP8266 and ESPHome
Last updated on August 1, 2026. Important warning: this is an educational alcohol-vapor detector, not a certified breathalyzer. It cannot determine whether someone is…
Continue with this article