
Last updated on June 21, 2026
The Home Assistant Energy Dashboard is a game-changer for any smart home. It’s the command center for seeing not just how much power you’re using, but where it’s coming from, what it’s costing you, and how you can slash your bill. But let’s be real—the first, and most frustrating, step is just getting your sensors to show up in the configuration. This definitive guide will walk you through, step-by-step, how to configure your energy sensors for the Home Assistant Energy Dashboard using the latest and greatest methods for 2026.
Prerequisites: Why Your Energy Sensor Isn’t Showing Up
Before we dive into the fix, it’s crucial to understand *why* Home Assistant might be ignoring your sensor. For an entity to be compatible with the Energy Dashboard, it must meet some very specific technical requirements. If your power monitoring sensor is missing from the dropdown list, it’s almost certainly missing one of these key attributes:
| Attribute | Required Value | What It Means |
unit_of_measurement | kWh (or Wh) | This must be total energy consumed over time, *not* instantaneous power (W or kW). |
state_class | total or total_increasing | Defines how the data accumulates. total_increasing is the most common, representing a meter that only ever goes up. This is non-negotiable. |
device_class | energy | This classifies the entity as an energy sensor, helping Home Assistant identify it for the dashboard. |
Don’t worry if your sensor doesn’t have these attributes out of the box. I’m about to show you exactly how to add or change them.
The 2026 Method (Recommended): Configure Sensors via the UI
Gone are the days of editing YAML files for every tiny tweak. For several versions now, Home Assistant has allowed us to manage almost everything from the graphical interface—a much safer and more intuitive approach.
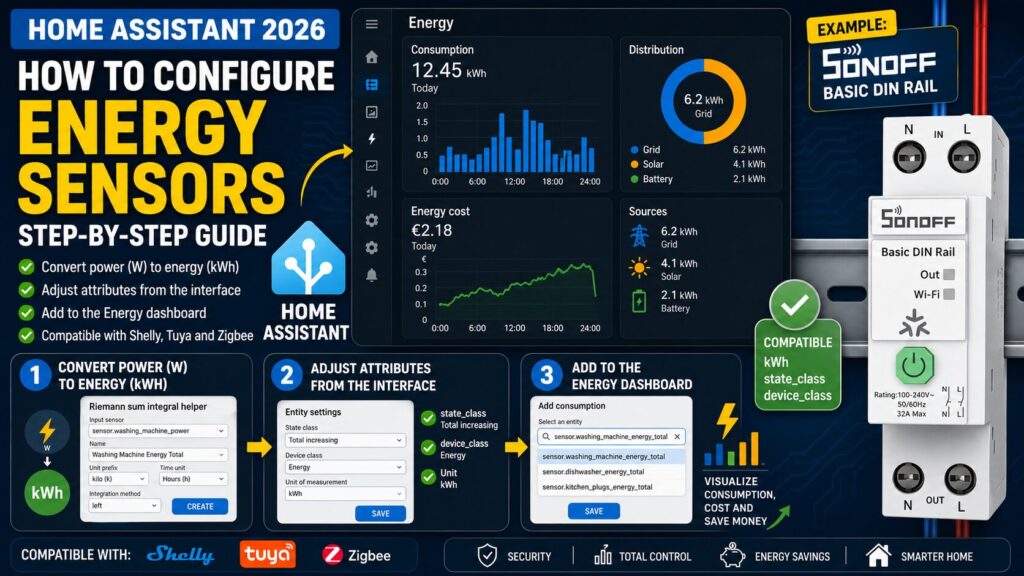
Step 1: Convert Power (W) to Energy (kWh)
The most common mistake is trying to add a sensor that measures instantaneous power (in Watts or kilowatts) directly to the Energy Dashboard. The dashboard needs an *accumulated* energy value (in kWh). To create this new sensor, we’ll use a Home Assistant “Helper.”
- Navigate to Settings > Devices & Services > Helpers.
- Click “Create Helper” and select “Riemann sum integral.” This helper is essentially a calculator that converts a power measurement into an energy measurement over time.
- Configure the Helper:
- Input sensor: Select your original power sensor (e.g.,
sensor.washing_machine_plug_power). - Name: Give it a descriptive name, like “Washing Machine Total Energy.” This will create an entity like
sensor.washing_machine_total_energy. - Metric prefix: Select kilo (k). This will convert the result directly to kWh.
- Time unit: Choose Hours (h).
- Integration method:
Leftis usually the most reliable option for fluctuating consumption.
- Input sensor: Select your original power sensor (e.g.,
- Click “Create.”
[Screenshot: UI for configuring the “Riemann sum integral” helper with fields filled out.]
That’s it! You’ve just created a new sensor that measures in kWh and, in most cases, will already be compatible with the Energy Dashboard.
Step 2: Tweak Attributes via the UI (If Needed)
If your newly created energy sensor (or an existing kWh sensor) still doesn’t show up, it’s likely missing the correct state_class or device_class. Thankfully, you no longer need to mess with customize.yaml.
- Go to Settings > Devices & Services and click the “Entities” tab.
- Find your new energy sensor (e.g.,
sensor.washing_machine_total_energy) and click on it. - Go to the “Settings” tab (the gear icon).
- Here, you can override certain attributes. Find the “State class” field and select “Total increasing.”
- Find the “Device class” field and select “Energy.”
- Save your changes.
[Screenshot: Entity settings window showing how to change the “State class” and “Device class”.]
With these two steps, 99% of sensors will now be ready to be added to the dashboard.
Adding the Sensor to the Home Assistant Energy Dashboard
Now for the easy part. With our sensor prepped and ready, all that’s left is to add it to the panel:
- Go to Settings > Dashboards and select “Energy.”
- In the “Grid consumption” section, click “Add consumption.”
- In the dropdown menu, your new sensor (e.g.,
sensor.washing_machine_total_energy) should now appear. Select it. - Save the configuration.
Important: The Energy Dashboard is not a real-time graph. It needs to collect data and typically has a delay of one to two hours before displaying new information. Be patient!
Examples with Popular Devices
While the method above is universal, some devices have quirks I’ve run into over the years.
- Shelly Sensors: The official Shelly integration is excellent. Devices like the Shelly EM or Shelly 1PM usually create the total energy entities (in kWh) automatically with all the correct attributes. Typically, it’s just install-and-go.
- Tuya Sensors: Compatibility here is a total crapshoot and depends on the specific device and manufacturer. If your Tuya smart plug only shows power in W, you’ll have to follow “Step 1” to create an energy sensor using the Riemann sum integral helper.
- Zigbee Sensors: If you’re using ZHA or Zigbee2MQTT, most smart plugs (from brands like Sonoff, Aqara, or Zooz) will expose an
_energyor_sum_of_consumptionentity. These are usually compatible out of the box. Just make sure you have a powerful Zigbee coordinator like the SMLIGHT SLZB-06 for a rock-solid network.
Setting Up Energy Cost Tracking
To have the dashboard calculate how much you’re spending, you need an entity that reports the price of electricity. In the US, this can be a simple fixed rate or a more complex Time-of-Use (TOU) rate. You can either find a custom integration for your specific utility company or create a simple “Input Number” Helper (under Settings > Devices & Services > Helpers) to store your fixed rate (e.g., $0.15/kWh).
Once you have a price entity, add it in Settings > Dashboards > Energy, under the “Grid consumption” section, by selecting it for “Use an entity with the current price.”
If your price sensor doesn’t appear in the list, it’s for the same reason as the energy sensors: it’s likely missing state_class: measurement. To fix it, follow the same process in “Step 2” above, but apply it to your price sensor.
The Legacy Method (Advanced): Manual YAML Configuration
While the UI is the recommended path forward, there are cases where manual configuration is still useful. If you prefer total control or have a complex setup, here are the YAML equivalents.
Integration Sensor (W -> kWh)
This code, added to your sensors.yaml file (or directly in configuration.yaml under the sensor: key), does the same thing as the Riemann sum helper. This is the old-school way.
- platform: integration
  source: sensor.dryer_plug_energy_power
  name: dryer_energy_yaml
  unit_prefix: k
  round: 2
Utility Meter
The Utility Meter helper is perfect for tracking consumption in cycles (daily, monthly, yearly). While you can now create these from the UI Helpers menu, the YAML configuration is still incredibly powerful. Add this to a utility_meter.yaml file (and be sure to include that file in your configuration.yaml).
daily_washing_machine_energy:
  source: sensor.washing_machine_total_energy
  name: Daily Washing Machine Consumption
  cycle: daily
Recorder Optimization
If you’ve customized your recorder configuration to optimize your database, don’t forget to include your new energy sensors! Otherwise, Home Assistant won’t store their long-term history, and the Energy Dashboard will be empty. Make sure to include both the energy (kWh) sensor and the cost entity (if you use one).
Common Troubleshooting (FAQ)
| Question | Solution |
| Why isn’t my sensor in the dropdown list? | Check the prerequisites again: the unit *must* be kWh or Wh, and it needs the correct state_class and device_class. Use the UI method in Step 2 to fix it. |
| It’s been 2 hours and I still don’t see any data. | 1. Make sure the device has actually consumed some energy. 2. Go to Developer Tools > States and confirm the sensor’s value isn’t “unknown” or “unavailable”. 3. Check your logs under Settings > System > Logs for any errors related to the energy dashboard or your sensor. |
| My dashboard shows a cost of $0.00. | You either haven’t configured a price entity in the Energy Dashboard settings, or the entity you added isn’t providing a valid number. |
| My energy data resets or looks wrong. | This usually happens if the power monitoring device reboots and resets its internal counter to zero. Ensure your sensor’s state_class is set to “Total increasing.” Home Assistant is smart enough to handle these resets correctly with that class. |
Setting up the Home Assistant Energy Dashboard is a fundamental step toward taking full control of your smart home. Once it’s running, you can create powerful automations, like running the dishwasher when electricity is cheapest or getting a notification if a device is drawing more power than usual. It’s the key to turning data into real savings.