
As an Amazon Associate, I earn from qualifying purchases. En calidad de Afiliado de Amazon, obtengo ingresos por las compras adscritas que cumplen los requisitos aplicables. If you buy through these links, the price is the same for you and Amazon pays me a small commission that helps keep Tecnoyfoto running.

Updated August 1, 2026.
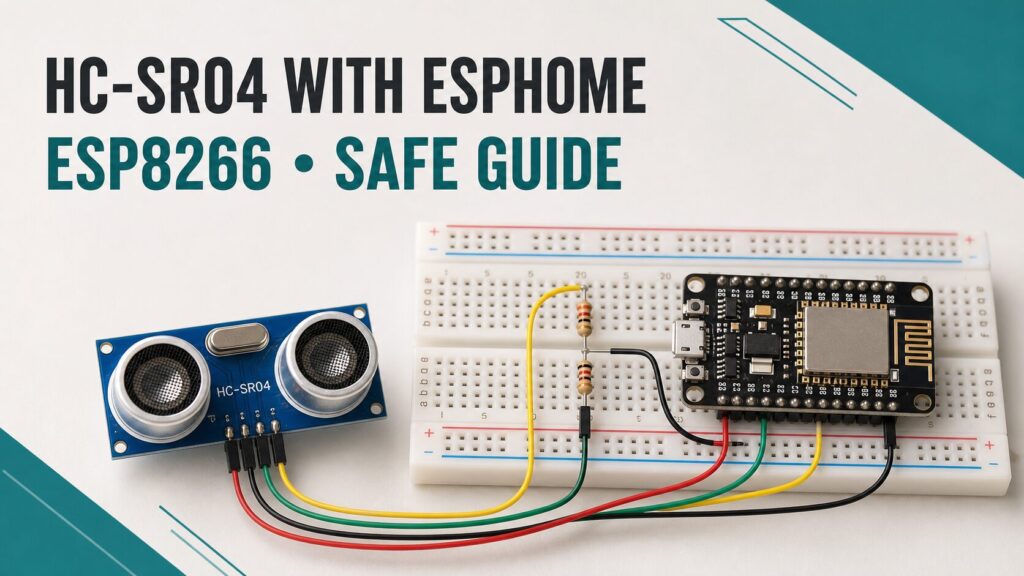
The HC-SR04 ultrasonic sensor measures distance without touching the target. Pair it with an ESP8266 running ESPHome and every reading can become a native Home Assistant entity. It is a low-cost project for checking the approximate level of a dry bin, detecting an object on a shelf or monitoring the position of a door. There is one important electrical detail, however: the HC-SR04 runs at 5 V and its Echo output can reach 5 V, while ESP8266 GPIO uses 3.3 V logic. This guide adds the voltage divider that keeps the input safe.
We will also replace a common but unsafe software shortcut: publishing a made-up distance when no echo returns. With the configuration below, a failed measurement remains unavailable instead of becoming a believable but false value.
Parts you need
- HC-SR04 ultrasonic moduleAffiliate link.
- An ESP8266 NodeMCU boardAffiliate link or Wemos D1 miniAffiliate link.
- One 1 kΩ resistor and one 2 kΩ resistor for the Echo voltage divider.
- A breadboard and Dupont jumper wiresAffiliate link.
- A USB cable and a stable USB power supplyAffiliate link.
Amazon links are affiliate links. Your price does not change and a purchase helps support the project.
How the HC-SR04 works
The ESP8266 sends a pulse of at least 10 microseconds to Trig. The module transmits eight ultrasonic cycles at 40 kHz and holds Echo high for the sound’s round trip to the target. ESPHome turns that pulse length into a distance in metres.
The HC-SR04 datasheet specifies a 2 cm to 4 m range, resolution up to 3 mm and an approximate 15-degree measuring angle. Do not assume four metres in a real installation: ESPHome notes that many modules work reliably to only about two metres. Target size, angle and material all matter, as do temperature and moving air.
Safe wiring: the voltage divider matters
Espressif specifies the ESP8266’s digital I/O in the 3.3 V domain with a 3.6 V maximum. Do not connect the 5 V Echo line directly to a GPIO. Put 1 kΩ between Echo and the input, then 2 kΩ between that input and GND. This lowers a 5 V pulse to approximately 3.33 V:
Vout = 5 V × 2 kΩ / (1 kΩ + 2 kΩ) = 3.33 V| HC-SR04 | NodeMCU ESP8266 | Connection |
|---|---|---|
| VCC | VU/VIN/5V | 5 V from the board’s USB supply |
| GND | GND | Common ground |
| Trig | D6 / GPIO12 | Direct connection |
| Echo | D5 / GPIO14 | Echo → 1 kΩ → GPIO14; GPIO14 → 2 kΩ → GND |
Board labels are easy to misread: D5 is GPIO14 and D6 is GPIO12 on a NodeMCU. Do not enter GPIO5 or GPIO6 in YAML simply because the PCB says D5/D6. GPIO6 is used by ESP8266 flash memory.
Unplug USB power while building the circuit. Confirm the VCC, Trig, Echo and GND order on your particular module because clone layouts can differ. The sensor and ESP8266 must share ground.
Prepare ESPHome secrets
Create a new ESP8266 device in the ESPHome add-on, then replace its configuration with the YAML in the next section. If you are new to the platform, start with my Home Assistant guide.
Keep credentials in secrets.yaml. Never publish that file or expose your Wi-Fi password in screenshots and repositories:
wifi_ssid: "YOUR_WIFI_NAME"
wifi_password: "YOUR_WIFI_PASSWORD"
hc_sr04_api_key: "BASE64_KEY_GENERATED_BY_ESPHOME"
hc_sr04_ota_password: "A_LONG_OTA_PASSWORD"
Current ESPHome YAML
substitutions:
  device_name: hc-sr04-esp8266
  friendly_name: "HC-SR04 ESP8266"

esphome:
  name: ${device_name}
  friendly_name: ${friendly_name}

esp8266:
  board: nodemcuv2

logger:

api:
  encryption:
    key: !secret hc_sr04_api_key

ota:
  - platform: esphome
    password: !secret hc_sr04_ota_password

wifi:
  ssid: !secret wifi_ssid
  password: !secret wifi_password

  ap:
    ssid: "HC-SR04 Fallback"
    password: !secret hc_sr04_ota_password

captive_portal:

sensor:
  - platform: ultrasonic
    name: "HC-SR04 Distance"
    id: hc_sr04_distance
    trigger_pin: GPIO12
    echo_pin: GPIO14
    update_interval: 1s
    timeout: 2.5m
    accuracy_decimals: 2
    filters:
      - lambda: |-
          if (isnan(x)) return {};
          return x;
      - median:
          window_size: 5
          send_every: 3
          send_first_at: 3
The official ESPHome ultrasonic sensor component reports metres. Here, timeout: 2.5m limits the waiting distance to 2.5 m. When no echo arrives, the component produces a not-a-number result; the lambda returns {}, so no fake distance is published. The median filter rejects isolated spikes without disguising failure as valid data.
For a Wemos D1 mini, select the board model ESPHome proposes for that device. GPIO12 and GPIO14 can remain unchanged when you wire D6 and D5 respectively. Validate the configuration before installing it. Use USB for the first flash and OTA for later updates.
Add the sensor to Home Assistant
- Open Settings → Devices & services in Home Assistant.
- Accept the discovered ESPHome device, or select Add integration and choose ESPHome.
- Assign it to an area and check the
sensor.hc_sr04_distanceentity. Home Assistant may generate a slightly different entity ID.
This simple dashboard card displays the result:
type: gauge
entity: sensor.hc_sr04_distance
name: Distance
min: 0.02
max: 2.5
needle: true
Calibration and testing
- Place a large, hard, flat target at 20, 50 and 100 cm.
- Compare each reading with a tape measure. Do not test inside the sub-2 cm dead zone.
- Tilt the target slightly. If the value disappears, the reflected pulse is missing the receiver.
- Set
timeoutto the range you actually need. An excessive timeout can make the module’s own timeout look like a valid reading.
To calculate a bin percentage, measure the sensor-to-surface distance when empty and full. Do not map zero to four metres blindly: mounting geometry and the dead zone both matter. An open HC-SR04 is also vulnerable to moisture and condensation, so use a compatible waterproof ultrasonic sensor for damp tanks or outdoor installations.
Troubleshooting
The entity is unavailable
Check common ground, the 5 V supply and whether Trig and Echo are reversed. Test with a flat object around 30 cm away. Unavailable is the correct state when no echo returns; do not replace it with an arbitrary number.
The distance jumps
Avoid fabric, foam, tiny objects and angled surfaces. Shorten the wires, move the sensor away from fans and verify the USB supply. The included median filter removes many isolated outliers.
The ESP8266 does not boot
Confirm that you selected GPIO12 and GPIO14 rather than boot-strapping pins. Disconnect the sensor, restart the board and inspect the serial log. Make sure the divider is on Echo—not on VCC.
Project video
The video shows the original project. When rebuilding it today, follow the safe wiring and updated YAML on this page—especially the Echo voltage divider.
Final thoughts
The HC-SR04 remains an inexpensive way to learn ultrasonic ranging, ESPHome and Home Assistant. A dependable installation does more than show a number: it protects the 3.3 V input, uses the right GPIO mapping, preserves unavailable readings and is tested in its real environment. To expand your station, add a BME280 with ESPHome for temperature, humidity and pressure.
Continue reading

Next related guide · 6 min read
DS18B20 with ESP8266 and ESPHome: Updated 1-Wire Guide
Updated August 2, 2026. A DS18B20 with ESP8266 and ESPHome is a simple, dependable way to measure temperature in Home Assistant. Every sensor has…
Continue with this article