
As an Amazon Associate, I earn from qualifying purchases. En calidad de Afiliado de Amazon, obtengo ingresos por las compras adscritas que cumplen los requisitos aplicables. If you buy through these links, the price is the same for you and Amazon pays me a small commission that helps keep Tecnoyfoto running.

Updated August 2, 2026.
A BMP280 with ESP32 and ESPHome is a straightforward project for measuring atmospheric pressure and the sensor’s internal temperature in Home Assistant. This guide connects the module over I²C, uses the current bmp280_i2c platform, and explains how to diagnose the common 0x76 and 0x77 addresses.
Important: the BMP280 does not measure humidity. Its temperature reading also depends on the PCB, sensor self-heating, and ambient conditions, so it is usually higher than the actual air temperature. Pressure is its primary measurement.
What the BMP280 actually measures
The Bosch BMP280 is a digital barometric sensor that communicates over I²C or SPI. Its pressure operating range is 300 to 1100 hPa. The chip can operate from −40 to 85°C, although its full-accuracy range is narrower. The sensor supply accepts 1.71 to 3.6 V, while the interface supply accepts 1.2 to 3.6 V.
Those limits apply to the chip rather than every blue breakout board sold online. Some modules contain a regulator, but not all of them include logic-level conversion on SDA and SCL. This project therefore powers the module from 3.3 V. See the official BMP280 datasheet for the electrical specifications.
BMP280, BME280, or BMP180?
| Sensor | Measurements | Interfaces | Best suited to |
|---|---|---|---|
| BMP180 | Pressure and internal temperature | I²C | Existing projects; it is an older generation |
| BMP280 | Pressure and internal temperature | I²C and SPI | Compact, inexpensive barometer |
| BME280 | Pressure, temperature, and humidity | I²C and SPI | More complete environmental monitoring |
If relative humidity matters, choose a BME280 and see the complete BME280 guide. Some sellers confuse the two models, so verify the component marking rather than relying only on the breakout board’s color.
Parts required
- A classic ESP32 development board such as an ESP32-WROOM-32 or ESP32 DevKit.
- A BMP280 breakout moduleAffiliate link.
- Dupont jumper wiresAffiliate link. You can also make your own cables.
- A USB cable suitable for your ESP32 board.
Some purchase links are affiliate links. They do not change your price and help support this website.
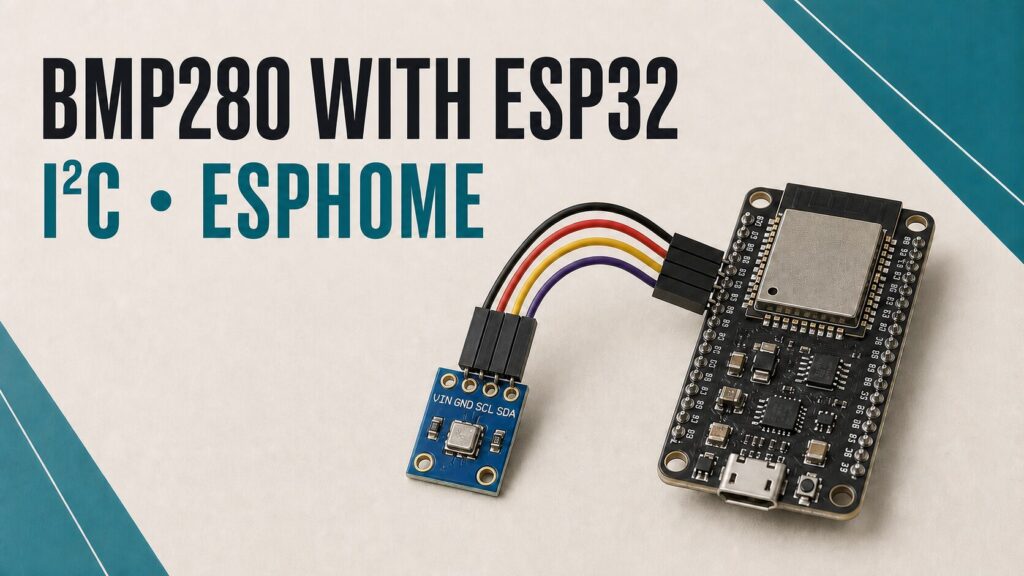
BMP280 to ESP32 I²C wiring
This wiring applies to a classic ESP32. ESP32-C3, C6, S2, and S3 boards use different pin maps, so check your board and select suitable I²C pins. ESPHome lets you declare SDA and SCL explicitly.
| BMP280 | Classic ESP32 | Purpose |
|---|---|---|
| VCC or VIN | 3V3 | Safe 3.3 V power |
| GND | GND | Common ground |
| SCL or SCK | GPIO22 | I²C clock |
| SDA or SDI | GPIO21 | I²C data |
On six-pin modules, CSB must stay high for I²C mode; the breakout usually contains the required pull-up. The SDO pin selects the address: GND commonly produces 0x76, while 3.3 V produces 0x77. Always check the schematic for your particular board.
If you use a separate 3.3 V supply, connect its ground to the ESP32 ground. I²C will not work reliably without a common reference.
Complete current ESPHome configuration
Create a new device in ESPHome and adjust the board name if the wizard selected a different model. Define the credentials and keys in secrets.yaml; do not put real credentials inside a configuration that you intend to share.
substitutions:
  device_name: bmp280-esp32
  friendly_name: BMP280 ESP32

esphome:
  name: ${device_name}
  friendly_name: ${friendly_name}

esp32:
  board: esp32dev
  framework:
    type: esp-idf

logger:

api:
  encryption:
    key: !secret api_encryption_key

ota:
  - platform: esphome
    password: !secret ota_password

wifi:
  ssid: !secret wifi_ssid
  password: !secret wifi_password
  ap:
    ssid: "BMP280 recovery"
    password: !secret fallback_password

captive_portal:

i2c:
  id: bus_bmp280
  sda: GPIO21
  scl: GPIO22
  scan: true

sensor:
  - platform: bmp280_i2c
    i2c_id: bus_bmp280
    address: 0x76
    temperature:
      name: "BMP280 Temperature"
      id: bmp280_temperature
      oversampling: 2x
    pressure:
      name: "BMP280 Pressure"
      id: bmp280_pressure
      oversampling: 16x
    iir_filter: 4x
    update_interval: 60s
The correct platform for this circuit is bmp280_i2c. A sensor connected over SPI uses bmp280_spi and requires a cs_pin. The current ESPHome BMP280 documentation covers both interfaces.
Error: could not find a valid BMP280 sensor
- Read the I²C scan: with
scan: true, the ESPHome log lists detected addresses. - Try 0x76 and 0x77: set
addressto the value reported by the scanner. - Check SDA and SCL: read the labels on the module because some boards use SCK and SDI.
- Check 3.3 V and GND: measure the supply and confirm that all grounds are connected.
- Confirm the model: a BME280 requires
bme280_i2c; changing only the address does not turn it into a BMP280. - Inspect the soldering: bad header joints and defective jumper wires are common causes of intermittent failures.
Internal temperature and calibration
Bosch specifies approximately ±0.5°C at 25°C and ±1°C from 0 to 65°C, but also states that the reading depends on PCB temperature and sensor self-heating. Keep the module away from the ESP32 regulator, avoid a warm sealed enclosure, and allow air to circulate.
An offset filter can correct a stable difference after comparing the module with a reliable thermometer in the same location. Do not copy someone else’s value: the offset changes with the board, enclosure, power use, and airflow.
temperature:
  name: "BMP280 Temperature"
  id: bmp280_temperature
  oversampling: 2x
  filters:
    - offset: -0.8  # Replace with your own calibration
Absolute pressure and sea-level pressure
The BMP280 reports the absolute pressure at its installation height. Weather services usually publish equivalent sea-level pressure. The two values therefore differ at locations above sea level, and that difference should not be corrected with an arbitrary fixed offset.
If you know the sensor’s fixed altitude accurately, add the following item under sensor:. Replace 120.0 with the actual height in metres above sea level:
  - platform: template
    name: "Equivalent Sea Level Pressure"
    unit_of_measurement: "hPa"
    device_class: atmospheric_pressure
    state_class: measurement
    accuracy_decimals: 1
    update_interval: 60s
    lambda: |-
      const float altitude = 120.0;  // Fixed altitude in metres
      if (isnan(id(bmp280_temperature).state) ||
          isnan(id(bmp280_pressure).state)) {
        return NAN;
      }
      return id(bmp280_pressure).state /
        powf(1.0f - ((0.0065f * altitude) /
        (id(bmp280_temperature).state +
        (0.0065f * altitude) + 273.15f)), 5.257f);
Estimating altitude
You can instead estimate altitude when you know the current sea-level pressure. That reference changes with the weather and should come from a nearby weather station. Always using 1013.25 hPa can create a substantial error.
  - platform: template
    name: "BMP280 Estimated Altitude"
    unit_of_measurement: "m"
    device_class: distance
    state_class: measurement
    accuracy_decimals: 1
    update_interval: 60s
    lambda: |-
      const float sea_level_pressure = 1013.25;
      if (isnan(id(bmp280_temperature).state) ||
          isnan(id(bmp280_pressure).state)) {
        return NAN;
      }
      return ((id(bmp280_temperature).state + 273.15f) /
        0.0065f) *
        (powf(sea_level_pressure /
        id(bmp280_pressure).state, 0.190234f) - 1.0f);
Choose the calculation that matches your known reference: sea-level pressure requires a known altitude, while altitude requires current sea-level pressure. The BMP280 alone cannot determine both unknown references.
Power consumption and battery projects
The BMP280 itself consumes very little power, but an ESP32 kept continuously on Wi-Fi consumes far more than the sensor. A battery-powered node needs longer measurement intervals, deep_sleep, and an energy budget that includes the regulator, battery, and wireless signal quality.
Conclusion
The BMP280 remains a good pressure sensor for an ESP32 project. Power it safely, confirm the I²C address, and use bmp280_i2c. Home Assistant will receive reliable absolute pressure, and an appropriate external reference lets you calculate sea-level pressure or an approximate altitude.
For more ESPHome sensor projects, see the DS18B20 1-Wire guide, the HC-SR04 distance guide, or the MH-RD rain sensor.
Follow Tecnoyfoto on YouTube

Continue reading
Next related guide · 6 min read
DS18B20 with ESP8266 and ESPHome: Updated 1-Wire Guide
Updated August 2, 2026. A DS18B20 with ESP8266 and ESPHome is a simple, dependable way to measure temperature in Home Assistant. Every sensor has…
Continue with this article